Thursday, November 17, 2011

TaDah!!! More little projects finished -- The Click-It Purse

Last night's sewing finish was a "Click It" Purse. I bought the pattern over a year ago during a Quilt Run, but failed to make it until last night. No grass grows under my feet... right?! lol
The 'magic' that keeps this little item securely closed is: ...
a piece of metal measuring tape! Did you guess what it was? 
This little purse [roughly 8.5" square] takes TWO FQs + two 8" pieces of metal tape. Be sure and round off the cut ends and smooth them with an old file or emery board. It might be a good idea to put a piece of masking tape over the ends as well... don't want the metal tape to "poke" it's way out of the fabric.

This little purse is for my DD to keep in her desk at work. I'm calling it the "911 Bag" because I plan on filling it with emergency items that could be useful: 'cotton angels', bandaids, small sewing kit, lip balm, small tube of Tylenol, Kleenex tissues, nail file, brush/comb,... etc etc..  I think DD will be pleasantly surprised to have this little surprise gifty. Probably wouldn't hurt to make another one for myself and keep it in my car.
A quick visit to a local bead shop was all I needed to creat a 'fob' to hang on the Prairie Point [these are "handles" to open purse]. I found some numbers -- 9-1-1 -- a few crystals, a couple of blue beads, some findings and voila a "911 Bobble" of sorts... just for fun.

That's all for today. I hope where ever you are that you have time to create something you like.
Hugs,

Wednesday, November 16, 2011

CUTE, QUICK, USEFUL... what could be better?

Spent quite a bit of time sewing yesterday -- the Yarn Goddess is now whining. lol. Finished up several projects. My fave one is of this teeny tiny tote to carry iPod earbuds, change, what-have-you. Handy little gadget and it only took 4 Charm Squares, plus a small corner of a 5th for the loop, and a 3/4" sliver to make the zipper pull. Well, OK, 5 Charm Squares. ;-)
The idea came from: Erin. She wrote a great tute... go check it out. Thank you Erin for such a nifty design! 

I constructed mine slightly different -- see below:
I cut two Charm Squares in half [front and lining] and installed the zipper without cutting into 1/2-circle shape. So easy to line up the ends... straight is better than a curve, eh?!  Next, I added two rectangle batting bits and edge-stitched the zipper... I also chose to lightly quilt, as I was using Cotton Classic batting. [Adding the batting AFTER zipper installation keeps the edges flatter so they don't get 'poofy'.]
Now, stack two more Charm Squares [backing/lining] and a scrap of batting -- tack-press a FP circle on top and cut through all layers. [Quick little bit of FM quilting is optional.]
Last... layer circle bits on top of zipper/rectangle, and using circle edge as guide, stitch around with a 1/4" s.a..  Trim if needed and overcast edge for neatness. Turn right side out, press, edge stitch, and you are done! 

Hope you like this little project. If you decide to make one, I would love to see it. Also, Erin has a Flicker site to share pics [link on her blog].

That's all for today. I hope where ever you are that you have time to create something you like.

Hugs,

Friday, November 11, 2011

WOW... I've Been Off Planet: Some Crochet to share. . .

Hello,
I've sure been off planet the last two weeks. My left foot had a bit of surgery and it's taking it's own sweet time to heal... you know the drill: stay off it, elevate, blah blah... ok. End of update, now for fun stuff:
Been crocheting more and sewing less -- just been working out that-a-way. Above, is Missy [my little 6 pound kitty] relaxing on one of her new blankies. And below is the other one I made in Pink... and, wow, is it PINK! lol
Open, these little blankies cover her beds in the house, but folded in half they pad her carrier purrrrfectly! They are quick to hook up and make good use of all the smallish bits of yarn leftover from other projects.

Please don't forget to go check out the other blogs sharing their crochet in the on-going CAL's -- it's nice to see what others are up to: LuAnn, Elly, Katrin [just to name a few].

That's it for today... thank you so much for stopping by to visit. I hope where ever you are that you have time to sew, crochet, knit, or otherwise make something that makes you or someone you love happy! Bye for now. . .

Hugs,

Thursday, October 27, 2011

TA DAH!!! All FOUR Halloween Bags are D-O-N-E!

Breathless! That's what I am. I have been scurrying about from room to room sewing and pressing like a mad-woman making sure I finished the Halloween Bags for 3 DGC and one DGGC. Whew!

They are done. Packed into their little packages; postage printed and applied; and we will all go to the postoffice together tomorrow morning at 0700! Sending them Express Mail to guarantee they will arrive by Mon the 31st.
A wonderful friend -- Joyce M. -- shared some extra Halloween blocks with me, so turning the blocks into bags was pretty quick and easy. THANK YOU, JOYCE! The kids are going to love their bags!
Our LQS didn't have any Halloween fabrics, so a quick trip to JoAnn's was in order.  The fabrics are fun and look good with the blocks, eh?!
My house is a total wreck and poor Missy is feeling a bit neglected, . . but mission accomplished! I sure wish I could learn NOT to procrastinate. I wonder if there is a 'pill' for that? There is for everything else! lol.


Ok... that's enough nonsence from me today -- lol -- thank you so much for dropping by for a visit. I hope you will come back. Until then, be happy... it sure beats the alternative!
Hugs,

Saturday, October 22, 2011

SUPER QUICK PILLOWs. . . In about 15 Min! ;-)

Need some pillows super-fast? No problem. If you can be happy with 'covers' and not anything fancy-smancy, then this method will work for you. My DD has a beach/ocean theme in her new apartment, so this pretty shell fabric will look nice on her new white couch.

Process:
I am making 4 pillows. Two 16 inch, & two 18 inch square [pillow forms from JoAnn's].

CUT fabric: two strips WOF x 16" and two strips WOF x 18 inches [or whatever size your pillows are].
Fold fabric exactly in half [long-wise, two short ends meet] and press. Fold over double a nice hem on each short end. Stitch. I stitched both the edge and the fold for extra durability and it looks nice that way. Press.

Line ruler up on FOLD side at one-half the size of pillow [remember, it's folded in half]. Here it is at 8 inches.

Flip the hemmed edge over the ruler [this marks the size of pillow]. Pull ruler away from the fold you just made and press this new fold in place. Stay with me; you'll see how this little trick works so fast to 'mark' the edges and size of your pillow.


Open up and re-fold using the pressed-fold line you just made... where my scrubby finger is pointing.


Now a couple of pins to hold edges in place; stitch the two short sides; press seams; turn, and voila! Stuff your pillow form inside and TaDah, you're done!


No kidding. . . each pillow will take less than 15 minutes to make.

That's all for today. Thank you so much for dropping by to visit. I hope where ever you are that you have time to create something for yourself or someone you love.

Hugs,

Friday, October 21, 2011

Small QUICK Bag. . . and Keeping Me Honest

Tuesday's Friendship Circle was a blast! Several members shared some cute and quick projects. The one I made is a small bag to corral essentials in my purse. Hopefully, keeping things neat, easy to find, and quick and easy to change to another purse. I made mine in pink!
This bag is soooo easy to make: Use pre-quilted fabric [or make your own... I used a few Charm Squares & machine quilted]. The size isn't important. Mine was "almost" 9 inches square, but rectangles are good, too. Install a zipper on two opposing edges. Fold and center the zipper and stitch a seam; then refold opposite direction and create last seam. Make sure your zipper is halfway open when sewing the last seam so you have space to 'turn' it right side out. The s.a. are zigzaged as I didn't want to drag out my serger. A zipper fob is just for fun. Next time I will add a 'tab' at top/bottom of zipper for a better finish! Live n learn, ya?! These make super gifts! See Jill's bag [below]... she used 'tabs' at both ends of the zipper and I think her's has a cleaner finish. Jill started with a rectangle, so her finished bag would be just right for cutting tools.

"Keeping Me Honest": Some of you know that I have been diagnosed with Type-II Diabetes. Now I am making a lot of life-style changes, not the least of which is dietary modifications. I thought I could keep myself 'honest' if I started posting about this... so, if you aren't interested just skip over this part. lol. Yesterday's lunch was:
A salad concoction that I arrived at mostly based on what was in my frig and the leftover Butternut Squash from the night before. Here are the salad ingredients: 2 handfuls of mixed greens [baby spinach, romaine, arugula, endive, radicchio, etc.], 1 Roma Tomato, 1 Cup baked Butternut Squash/cubed, 1 Persian Cuke, 2 Oz water-packed Albacore Tuna, 1/4 C low fat Cottage Cheese, 2 Tblsp Salsa [the last two are my "dressing"]. A sprinkle of mixed herbs on top with a dusting of Garlic Powder. It was VERY tasty! Filling and satisfying, too. If you choose to try it, please let me know how you like it.


Along with better food choices also comes the dedication to move more. Last night I walked for 1.5 hours at the Street Faire. Yippee for me! If YOU are making life-style changes, too, perhaps you will add a comment to this post -- I would love all the support I can garner to stay on track. And, if you have a blog, please leave your blog addy as part of your signature line in your comment. That way I can visit you and give you support, too. It's always easier to do this kind of thing with friends! Do you agree?

I can't resist sharing this picture of Missy. . . she has found a new place to explore and "hide" in. There is a very small space under the sewing machine cabinet, behind the small chest and where two FeatherWeights are stored. I don't know what she thinks is so interesting in the trash bin! lol. . . . kitties are so much fun!

Thank you for stopping by. I hope where ever you are, you have time to create something that makes you happy! Sew, Quilt, Knit, Tat, Crochet, occasional Cooking. . . Life Is GOOD!

Hugs,

Monday, October 17, 2011

Monday AGAIN Already???

Hello Friends in BlogLand. . .
This is just a quickie post to say "Hi" and leave you with a chuckle -- Monday's need all the help they can get! lol


After I hit the market for some produce, and then JoAnn's for some supplies for tomorrow's project at Friendship Circle, I plan to sit on my tushie and crochet on Laura's soon-to-be Granny Gone Wild afghan.  What are all of you up to today???

Thank you for stopping by. I hope where ever you are, you have time to create something that makes you happy! Sew, Quilt, Knit, Tat, Crochet, occasional Cooking. . . Life Is GOOD!

Hugs,

Friday, October 7, 2011

GRANNY GONE WILD CAL: My Rectangle Granny

Grannies, grannies, every where grannies! LuAnn of Loose Threads has just launched a new Crochet-A-Long.  LuAnn is making a multi color square granny. I am making a rectangle shape in Blue, White, & Yellow for my DD's new apartment. This is where I am as of yesterday:


Making a square into a rectangle didn't go as smoothly as I hoped it would. lol. First, I tried making a chain, joining into a ring... nope, don't like it.


Second attempt: I made some "eyelets" and crocheted clusters from the eyelets... nope, don't like this either.


Third try: after some discussion with crochet friends and some trial and error, LuAnn suggested a regular chain, BUT put some clusters down the chain without crocheting on both sides of the beginning chain! YES! Success... it works fine and lays well with no ruffling of edges! Thank you, LuAnn for the suggestion... aren't friends great?!


FINALLY, I begin: Because grannies have 3 double crochets in each cluster with a chain-1 in between, we can proceed with a chain of any number as long as it is a multiple of FOUR.  Because I wanted a specific width-to-length ratio, I chose to Chain16. From there it is easy:

The rectangle beginning: Ch16, DblCr in 4th Ch from hook [this creates an 'end' loop], DblCr in next Ch [2 times- this completes the first 'cluster']; Ch1. Now, *Skip next Ch, DblCr in each of the next 3 Ch, then Ch1* rep betwn ** until two Ch from end. Skip 1 Ch and DblCr in last Ch [this forms the end loop for the other end].  Proceed as for Granny, changing colors on successive rounds [if that is your plan]. A granny is made by Crocheting 3 DblCr in each Ch1 Space [cluster made], Ch1. In the corners: Cluster, Ch 1, Cluster; Ch1. That's all there is to it.

I hope you will join in so we can keep each other motivated! If you just want to root us on, that is great too! Click here to go to the Flicker site to see more pictures.

That's all for today... thank you for stopping by to visit. Until next time, I hope you will create something that makes you happy!

Hugs,

Friday, September 23, 2011

TA DAH!! It's Finished. . . now, back to quilting ;-)

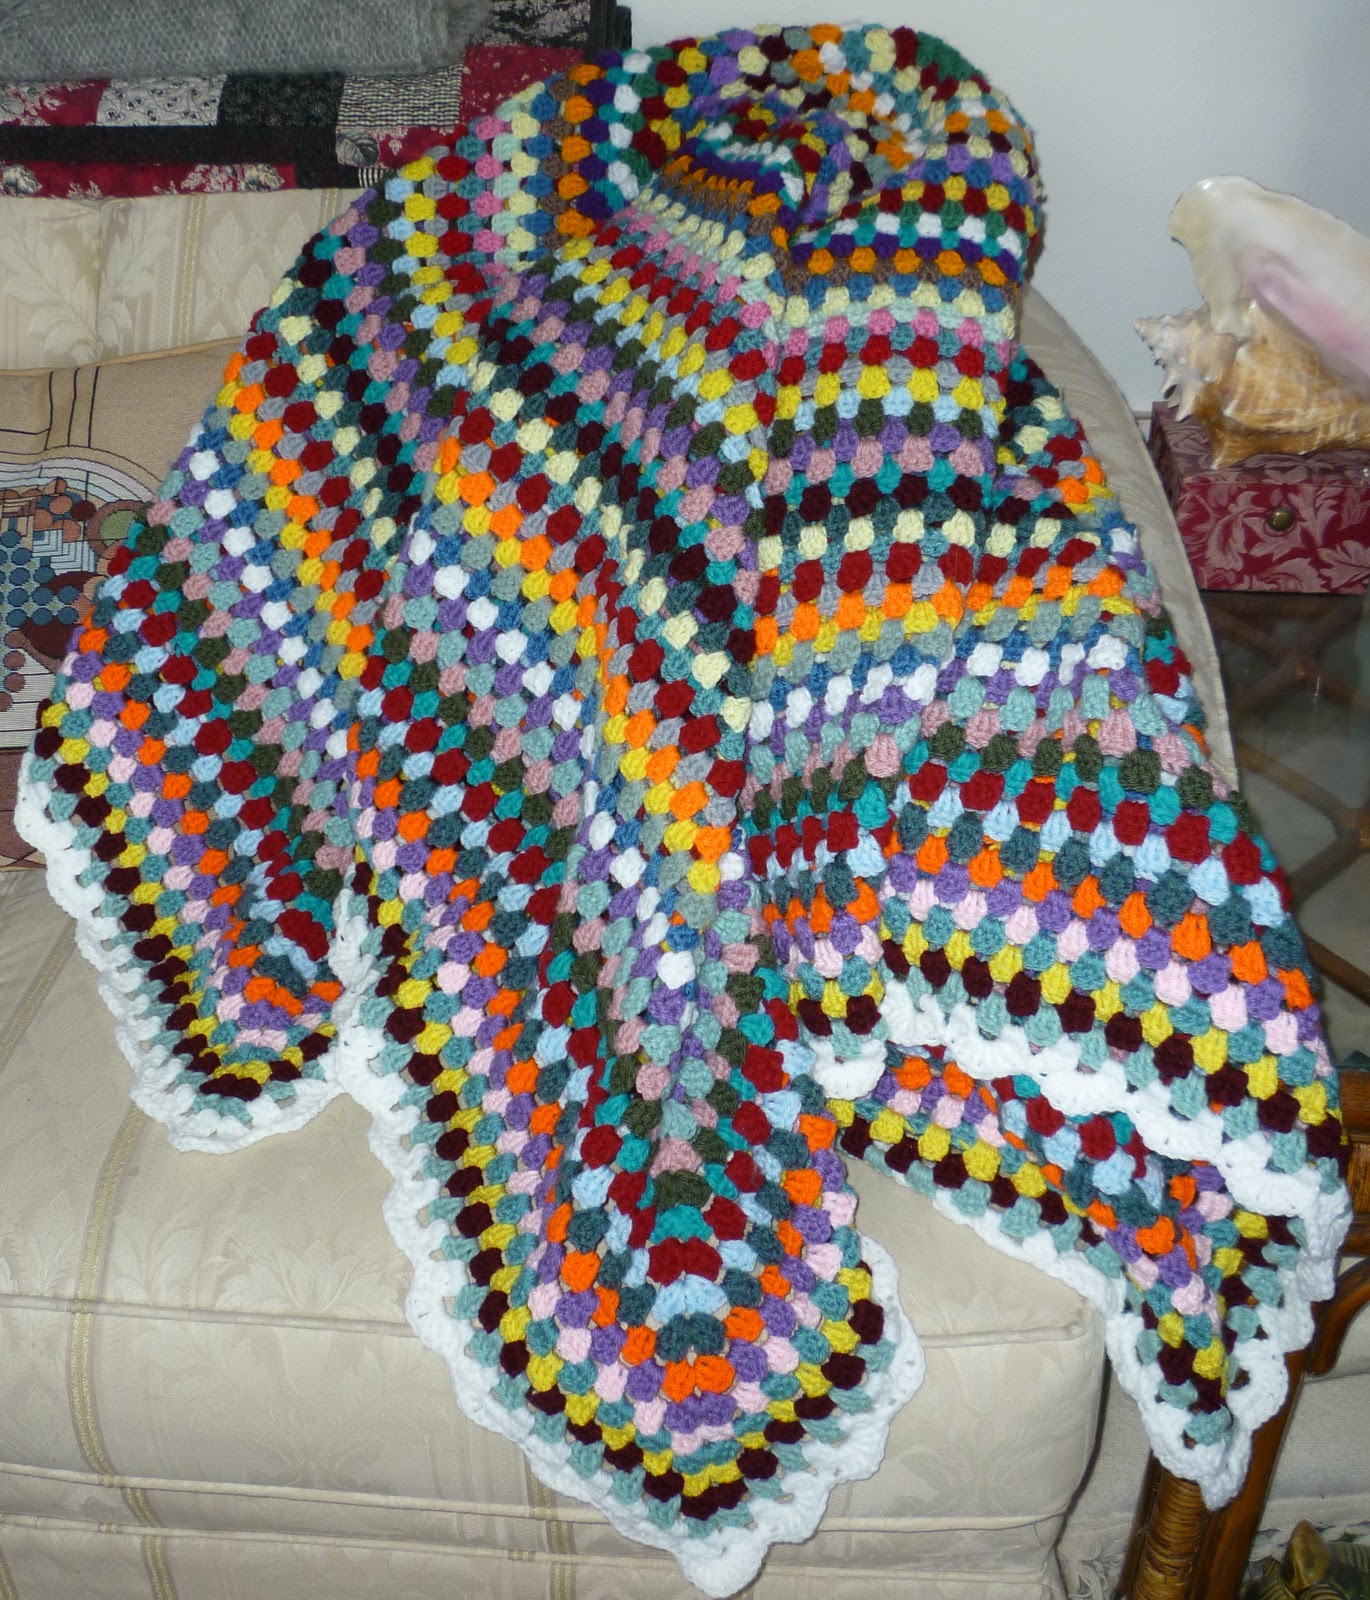
Well, it's done... my Giant Granny from the CAL on Sucrette's blog is finished. It took exactly 3 weeks to make -- one to do the crochet, and two to decide how to finish it and put on 3 more rows to balance the colors. Isn't that funny? For me, design always takes longer than the actual "making" of something. 

It turned out quite BIG! Here it is covering half the loveseat in my living room. lol...


First, I tried making the edging shells of Treble Crochets ... that seemed pretty heavy for this blanket.


So, I pulled it out and redid it using Double Crochet instead. This looks much better [pic below].  Do you agree? The smaller edging doesn't dominate the whole blanket; just sits nicely on the edge and behaves itself. lol. It looks a bit unruly now, but will look better after it has been blocked.


This afghan is too big to get the whole thing in one picture, but I think the pic below shows enough of it that you can see the colors.


This was a very fun project to do. It was even more enjoyable because I have been crocheting along with friends: EllyD, LuAnn, Katrin, and Sucrette [this is a new URL for Sucrette].  All these ladies make fabulous art! I'm looking forward to sharing another project together sometime.

Well, this is the end of crochet for awhile -- I must get back to sewing, quilting, and finishing up those last two placemats and I have a new embroidery project all ready to go: [the drawing comes from BariJ's site. I redrew a few of the lines to more closely fit my needs -- artist's license, eh?!]


Thank you for stopping by to visit. I hope you will come back again... until then, may you have loads of time to quilt, sew, stitch, crochet, knit. . . whatever makes YOU happy! What do you like to do the best?

Hugs,
PS: There is a link to a Flicker site on Sucrette's blog [or click on the button above and on the right side of my blog], if you would like to see what the other Giant Grannies look like.

Wednesday, September 14, 2011

QUICK UPDATE ON GIANT GRANNY SQUARE C.A.L.

Making this Giant Granny Square has been a lot of fun. And, hey, it keeps me busy and off the streets so what's not to like?! lol.

To share my progress with you, I've u/l a few photos. Notice in the first two, my little "helper" snuggeled into the yarn -- I left my seat for a few minutes and when I came back I saw her. Couldn't resist taking Missy's picture!

[When Missy saw me with the camera, she ducked her head...
she seems to be saying, "... you can't see me!"]

This afghan is BIG! It covers the whole top of my Queen size bed. I plan on crocheting about 3 more rows to balance out some color and lights n darks, then will put the edging on. The edging will be white. I'm trying to think up a simple edging, but so far have not decided. I hope you like the pictures. If nothing else, this blankie is colorful! lol


Now it's time to get back to sewing. I have a few placemats calling my name saying, "come finish my quilting!" And then there are a few Siggies to make.  Sewing, Quilting and Quilting Friends bring a lot of happiness into my life. I'm so grateful we share this craft with each other!

Thank you for stopping by to visit. I hope you will come back again... until then, may you have loads of time to quilt, sew and stitch!

Hugs,