Friday, October 21, 2011

Small QUICK Bag. . . and Keeping Me Honest

Tuesday's Friendship Circle was a blast! Several members shared some cute and quick projects. The one I made is a small bag to corral essentials in my purse. Hopefully, keeping things neat, easy to find, and quick and easy to change to another purse. I made mine in pink!
This bag is soooo easy to make: Use pre-quilted fabric [or make your own... I used a few Charm Squares & machine quilted]. The size isn't important. Mine was "almost" 9 inches square, but rectangles are good, too. Install a zipper on two opposing edges. Fold and center the zipper and stitch a seam; then refold opposite direction and create last seam. Make sure your zipper is halfway open when sewing the last seam so you have space to 'turn' it right side out. The s.a. are zigzaged as I didn't want to drag out my serger. A zipper fob is just for fun. Next time I will add a 'tab' at top/bottom of zipper for a better finish! Live n learn, ya?! These make super gifts! See Jill's bag [below]... she used 'tabs' at both ends of the zipper and I think her's has a cleaner finish. Jill started with a rectangle, so her finished bag would be just right for cutting tools.

"Keeping Me Honest": Some of you know that I have been diagnosed with Type-II Diabetes. Now I am making a lot of life-style changes, not the least of which is dietary modifications. I thought I could keep myself 'honest' if I started posting about this... so, if you aren't interested just skip over this part. lol. Yesterday's lunch was:
A salad concoction that I arrived at mostly based on what was in my frig and the leftover Butternut Squash from the night before. Here are the salad ingredients: 2 handfuls of mixed greens [baby spinach, romaine, arugula, endive, radicchio, etc.], 1 Roma Tomato, 1 Cup baked Butternut Squash/cubed, 1 Persian Cuke, 2 Oz water-packed Albacore Tuna, 1/4 C low fat Cottage Cheese, 2 Tblsp Salsa [the last two are my "dressing"]. A sprinkle of mixed herbs on top with a dusting of Garlic Powder. It was VERY tasty! Filling and satisfying, too. If you choose to try it, please let me know how you like it.


Along with better food choices also comes the dedication to move more. Last night I walked for 1.5 hours at the Street Faire. Yippee for me! If YOU are making life-style changes, too, perhaps you will add a comment to this post -- I would love all the support I can garner to stay on track. And, if you have a blog, please leave your blog addy as part of your signature line in your comment. That way I can visit you and give you support, too. It's always easier to do this kind of thing with friends! Do you agree?

I can't resist sharing this picture of Missy. . . she has found a new place to explore and "hide" in. There is a very small space under the sewing machine cabinet, behind the small chest and where two FeatherWeights are stored. I don't know what she thinks is so interesting in the trash bin! lol. . . . kitties are so much fun!

Thank you for stopping by. I hope where ever you are, you have time to create something that makes you happy! Sew, Quilt, Knit, Tat, Crochet, occasional Cooking. . . Life Is GOOD!

Hugs,

Monday, October 17, 2011

Monday AGAIN Already???

Hello Friends in BlogLand. . .
This is just a quickie post to say "Hi" and leave you with a chuckle -- Monday's need all the help they can get! lol


After I hit the market for some produce, and then JoAnn's for some supplies for tomorrow's project at Friendship Circle, I plan to sit on my tushie and crochet on Laura's soon-to-be Granny Gone Wild afghan.  What are all of you up to today???

Thank you for stopping by. I hope where ever you are, you have time to create something that makes you happy! Sew, Quilt, Knit, Tat, Crochet, occasional Cooking. . . Life Is GOOD!

Hugs,

Friday, October 7, 2011

GRANNY GONE WILD CAL: My Rectangle Granny

Grannies, grannies, every where grannies! LuAnn of Loose Threads has just launched a new Crochet-A-Long.  LuAnn is making a multi color square granny. I am making a rectangle shape in Blue, White, & Yellow for my DD's new apartment. This is where I am as of yesterday:


Making a square into a rectangle didn't go as smoothly as I hoped it would. lol. First, I tried making a chain, joining into a ring... nope, don't like it.


Second attempt: I made some "eyelets" and crocheted clusters from the eyelets... nope, don't like this either.


Third try: after some discussion with crochet friends and some trial and error, LuAnn suggested a regular chain, BUT put some clusters down the chain without crocheting on both sides of the beginning chain! YES! Success... it works fine and lays well with no ruffling of edges! Thank you, LuAnn for the suggestion... aren't friends great?!


FINALLY, I begin: Because grannies have 3 double crochets in each cluster with a chain-1 in between, we can proceed with a chain of any number as long as it is a multiple of FOUR.  Because I wanted a specific width-to-length ratio, I chose to Chain16. From there it is easy:

The rectangle beginning: Ch16, DblCr in 4th Ch from hook [this creates an 'end' loop], DblCr in next Ch [2 times- this completes the first 'cluster']; Ch1. Now, *Skip next Ch, DblCr in each of the next 3 Ch, then Ch1* rep betwn ** until two Ch from end. Skip 1 Ch and DblCr in last Ch [this forms the end loop for the other end].  Proceed as for Granny, changing colors on successive rounds [if that is your plan]. A granny is made by Crocheting 3 DblCr in each Ch1 Space [cluster made], Ch1. In the corners: Cluster, Ch 1, Cluster; Ch1. That's all there is to it.

I hope you will join in so we can keep each other motivated! If you just want to root us on, that is great too! Click here to go to the Flicker site to see more pictures.

That's all for today... thank you for stopping by to visit. Until next time, I hope you will create something that makes you happy!

Hugs,

Friday, September 23, 2011

TA DAH!! It's Finished. . . now, back to quilting ;-)

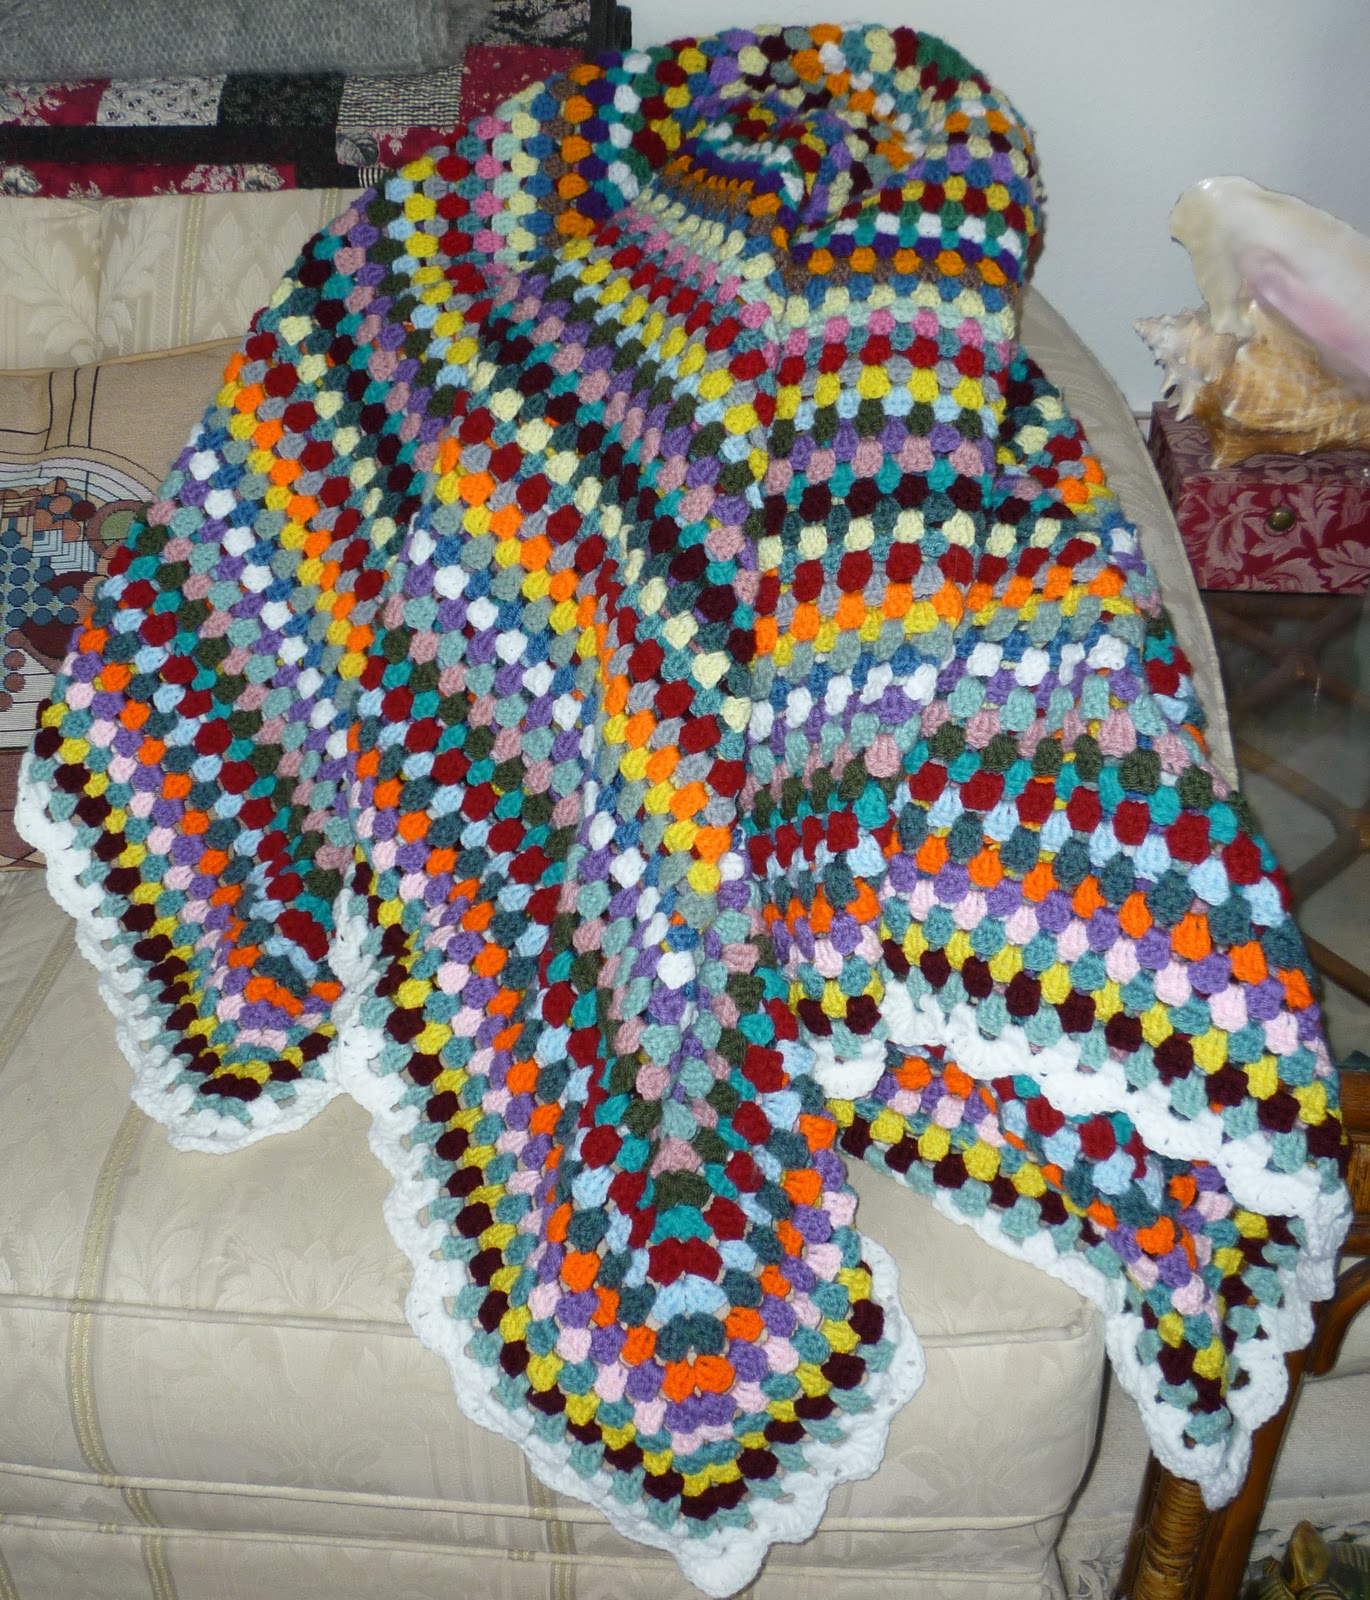
Well, it's done... my Giant Granny from the CAL on Sucrette's blog is finished. It took exactly 3 weeks to make -- one to do the crochet, and two to decide how to finish it and put on 3 more rows to balance the colors. Isn't that funny? For me, design always takes longer than the actual "making" of something. 

It turned out quite BIG! Here it is covering half the loveseat in my living room. lol...


First, I tried making the edging shells of Treble Crochets ... that seemed pretty heavy for this blanket.


So, I pulled it out and redid it using Double Crochet instead. This looks much better [pic below].  Do you agree? The smaller edging doesn't dominate the whole blanket; just sits nicely on the edge and behaves itself. lol. It looks a bit unruly now, but will look better after it has been blocked.


This afghan is too big to get the whole thing in one picture, but I think the pic below shows enough of it that you can see the colors.


This was a very fun project to do. It was even more enjoyable because I have been crocheting along with friends: EllyD, LuAnn, Katrin, and Sucrette [this is a new URL for Sucrette].  All these ladies make fabulous art! I'm looking forward to sharing another project together sometime.

Well, this is the end of crochet for awhile -- I must get back to sewing, quilting, and finishing up those last two placemats and I have a new embroidery project all ready to go: [the drawing comes from BariJ's site. I redrew a few of the lines to more closely fit my needs -- artist's license, eh?!]


Thank you for stopping by to visit. I hope you will come back again... until then, may you have loads of time to quilt, sew, stitch, crochet, knit. . . whatever makes YOU happy! What do you like to do the best?

Hugs,

PS: There is a link to a Flicker site on Sucrette's blog [or click on the button above and on the right side of my blog], if you would like to see what the other Giant Grannies look like.

Wednesday, September 14, 2011

QUICK UPDATE ON GIANT GRANNY SQUARE C.A.L.

Making this Giant Granny Square has been a lot of fun. And, hey, it keeps me busy and off the streets so what's not to like?! lol.

To share my progress with you, I've u/l a few photos. Notice in the first two, my little "helper" snuggeled into the yarn -- I left my seat for a few minutes and when I came back I saw her. Couldn't resist taking Missy's picture!

[When Missy saw me with the camera, she ducked her head...
she seems to be saying, "... you can't see me!"]

This afghan is BIG! It covers the whole top of my Queen size bed. I plan on crocheting about 3 more rows to balance out some color and lights n darks, then will put the edging on. The edging will be white. I'm trying to think up a simple edging, but so far have not decided. I hope you like the pictures. If nothing else, this blankie is colorful! lol


Now it's time to get back to sewing. I have a few placemats calling my name saying, "come finish my quilting!" And then there are a few Siggies to make.  Sewing, Quilting and Quilting Friends bring a lot of happiness into my life. I'm so grateful we share this craft with each other!

Thank you for stopping by to visit. I hope you will come back again... until then, may you have loads of time to quilt, sew and stitch!

Hugs,

Wednesday, September 7, 2011

GIANT GRANNY UPDATE . . .

Hello Friends,
This has been a really busy week. I did find time to put almost 40 rounds on my Giant Granny Square. I'm wondering if this Brilliant and Zingy Orange might just be a little TOO much??? What does everyone think? If I add Orange on round 40, will Orange be all I see when the blanket is finished? Hmmm, would love your opinions!

Here it is at round 39... I can barely get the whole thing into the picture frame. lol


Thank you for stopping by to visit. Tomorrow [after Guild Meeting] I hope to put up the pictures from the Tuesday Friendship Quilter's Meeting. . . until then, may you always have the time and inclination to create something for yourself or someone you love.

Quilty Hugs,


PS: The bright color at round 19 (in pic above) is actually a 'gold'... it sure draws attention to itself. That's why I am a bit concerned about adding bright Orange! lol. I guess my color-insecurities are showing like a dangling slip!

Thursday, September 1, 2011

GIANT GRANNY SQUARE CAL. . . With A Lot Of Help From My Friends!

You know the lyrics of the song. . . "With A Little Help From My Friends"? Well, that's exactly what I received this week -- in spades! I received a LOT of help!  On Tuesday, MaryEllen gave me a HUGE laundry basket of yarn! WOW!! Thank you, Mary Ellen!

And then, many friends provided lots of "hand holding" to help me remember how to crochet, as I haven't done any in quite awhile. Thank you for the help, the Tutes, the encouragement: EllyD, LuAnn, Katrin, and Sucrette [who began the CAL... Crochet A Long]. Thank you so much.

This is how much I have done so far this evening... not much, I know, but it's a beginning:


To change colors in the next round, I'm guessing we cut the yarn and pull it through the sl st just made, turn, attach new color and crochet the following round. Not sure if that is correct, but that is how I plan to do it. lol

That's all for now. Thank you so much for stopping by for a little visit. I hope you will CAL with all of us, too. The info may be found on Sucrette's blog [click on her link above].

Bye for now. .  .

Hugs,


Tuesday, August 23, 2011

SMALL, but DONE! . . . An Easy Stitch n Slash Project


Not too long ago -- maybe a couple of months -- several of us were making "Sew n Slash" projects. Rosa made a neat rug for her bathroom, and Joy and I made potholders. The one above shows my last one. Don't know why or how this poor little thing got left unfinished. . . probably just got forgotten under a pile of other stuff. LOL. Right now it is in the dryer getting all "fluffy".

The method is really easy and quick: LAYER several pieces [I used five, 8" squares of FLANEL] all RIGHT SIDE UP. PIN in a couple of places to secure; STITCH DIAGONAL lines about ONE INCH apart; Carefully CUT [or use Rotary Slasher]  inbetween the stitching lines through all but the LAST layer. BIND or finish how you want. Machine wash and dry to fluff out the layers and make it "bloom".  Below, after its bath and run through the dryer:

That's all for now. Thank you for stopping by to visit.

Hugs,
PS... Please note: the "date" of this posting shows "Sat, 20 Aug", even tho' today [Tues., 23 Aug] is the day I'm posting. Not sure how to change that. I began on Sat., but was not able to finish until today. Does anyone know how to change the dates? Regarding blogging, I still have a strong learning curve going on. lol.

Tuesday, August 16, 2011

SOME FINISHES! A Spider, Pillowcases, Receiving Blankets & some organizing. . .


Ta Dah! Finally, a finish -- the little Spider quilt, which I have named: "Itsy Bitsy Spider" [after the childrens' song]. It gave me the shivers, but I put a spider drawing on the label... couldn't resist. And added a Spider Plant, too, just for fun.

Thank you everyone for your input. I agree with your good advice and put a red binding on it. I like it. I am thinking about embroidering a couple of little black spiders in the upper left & lower right hand corners. What do you think? Would that be too creepy?


[note: the quilt is straight, but my photograph is a bit wonky! I need more practice, or maybe a class!!]
Sorry it's been almost two weeks since I posted, but I have been mostly off the puter these last two weeks. First, I had some lovely company from out of town [out of the Country, actually]. Did a little reorganizing and refurbishing around the house, and even been working on cleaning out the garage! Wow.

Have completed a number of small projects. The first one [below] is a reversible receiving blanket for my soon-2-b-born great-granddaughter Nailay [means 'I love you' in Native American]. The blanket takes TWO, one-yard-pieces of flannel. The process: trim up the sides; sew together all around leaving about 12 inches open to turn; turn; slip stitch opening, and voila! A blankie. Oh, I did sandwich 1.5" of cotton eyelet lace in the seam and used a saucer to round the corners... this makes up pretty fast.


Making pillowcases is so much fun. Talk about almost instant gratification! lol. Below is a case made from material depicting the famous Route 66 highway that runs mostly East to West across a lot of the USA. I made this for my DD Laura to commemorate our drive on Rte 66 a year ago last May. She is stoked! I tried something different this time: after turning the "tube" [which encloses all the seams in the hem] I topstitched the flange. Then I finished it off as usual. Hopefully this little trick will make it all behave better in the laundry ... we'll see. ;-)

Below is a very fuzzy picture--sorry-- but you can make out some of the attractions that are along Route 66.


Below shows my beginning efforts to put up new shelves. I hope to eventually get everything sorted into nice looking baskets and have those sitting on these shelves. As you can see, I need to shop for and install a couple more shelves. lol. The top shelf, although not especially pretty looking, is organzied and done... the other one needs a lot of work yet! lol


That's all for now. Thank you so much for stopping by to visit!  I hope where ever you are, that you have time to make something that makes you or someone you love happy!

Hugs,

Thursday, July 28, 2011

SCRAPPY SPIDER IS QUILTED & A Quick Salad Idea Using Avocados. . .

Remember the Spider Web Ring that Cattinka put together a few months ago? Many of us joined the SpiderWeb fun. Thanks again, Katrin! Making the blocks was fun... and, I used up a lot of scraps that were just laying around not doing anything. lol.

Above is my little WH. It is machine quilted, but not bound yet. I'm thinking maybe a RED binding... what do you think? Also, the SpiderWeb quilting design does not cover all of the Yellow Border-- so I am thinking of embroidering a few small black spiders in the Yellow... is that a good idea, or should I leave well enough alone? Please tell me what you think. Thank you. [Sorry for the wonky picture. . . I'm not sure how it got so crooked. ;-( ]


Recently we acquired an InfraRed Gas Grill. My DD Laura is getting very good at grilling! The other night she made some Alaska Wild Samon -- while she was doing that, I created an Avocado and Tomato Salad to go with it... no dressing, just a sprinkle of some mixed herbs on the top. We had just returned from a trip to the Carlsbad Farmer's Market with fresh produce, so that dictated our ingredients. lol. It was delish. We ate all the fish before I remembered to take a pic! lol.

Until next time, I hope you have the time and inclination to create something that makes you or someone you care about happy.
Hugs,

Wednesday, July 27, 2011

I FOUND IT.... I found it!

Yep, I found the picture that was 'lost' the other day when creating the post for the BowTie placemats. Guess where it was? Still in the camera! . So without further ado, here it is:
My house has a tiny little area off one end of the kitchen that we call the "Morning Room". Kind of a joke, really, as the area is so small. Because the window faces the street, it is a nice little place to sit and enjoy morning coffee, while watching the day begin.

The pic below shows how I finished the backing. I did a very simple layer, stitch around the edge [no binding!], and turn. Makes for a nice and very quick edge finish. After the item is "birthed", just sew up the little partial seam and ta dah, it is done! I like that.

Thank you for stopping by to visit. . . until next time. . .

Hugs,

Tuesday, July 26, 2011

TWO DOWN & 2 TO GO!

Quite a few quilters have been having a lot of fun lately sewing up BowTie blocks. There is a sew-a-long on the Net and FB right now. The challenge is to make One Block A Day during the summer months... get the scoop here and here. It's not too late to join in the FUN!


TWO placemats finished! Yippee. I like the way they turned out. I might put a tad more quilting in them. Definitely stitch in the ditch around the plaid border to hold the backing snugly in place. Then maybe outline around the BowTie shapes.  Above is a pic of one. The pic of the two finished ones sitting on my morning room table is currently MIA. Don't know where it is hiding! lol

Because I planned to attach the backing with a "stitch around the edge & birth" technique, I just created a very simple machine quilted grid on the top layered with Warm&Natural batting using a walking foot. Masking tape made a quick and easy line to follow . The tape was laid down using the block intersections and a ruler for the corners [which were rounded later] . Quick and easy-peasy.

I make sure to  remove the masking tape as soon as the line is quilted -- if left on it can leave a sticky residue that is a pain to remove. Ask me how I know this! lol


Until next time, thank you for stopping by. I hope where ever you are that you find some time to stitch something that makes you happy!

Hugs,

Friday, July 22, 2011

TO BORDER, or NOT TO BORDER. . . that is the question

This is a real "quickie" post:

Hmmmmmm, not sure if the six-bowtie-block placemats need a border or not. What to do? Set a plate on it and check for size! If it doesn't pull up too much in the quilting, then it will be fine without a small border. Then again, washing will shrink it a bit also. Perhaps just a small one-inch border which will leave extra room on the mat for the silverware, etc. . .


What do you do when 'weighing' border options?

Until next time, thank you for stopping by. . .
Hugs,