Monday, September 30, 2013

PAPER ORCHIDS. . . Amazing!!!

The most amazing thing happened this year to one of my orchids. Well, first it bloomed for NINE months!! It set buds last December; bloomed in January, and kept right on blooming! This plant kept its flowers until mid September when we had a very hot spell and all the fans in my house were going full-boar! I think it was the hot air hitting it that finally did the blooms in. Here's the amazing part: the flowers never dropped... they dried right on the stem!
Phalaenopsis... bloomed for 9 months!
Usually the blooms turn a bit brown and yucky, and then drop. Not this year! The flowers became like fine, thin paper. Translucent.
Orchid's center dried in tact
In the close up photo above, even the orchid's "veins" are apparent. I've been growing orchids for years -- decades actually, and I have never seen anything like this. Very exciting.

Until next time. . . Thank you so much for popping in to visit. I might go sew some string blocks this afternoon... what are YOU up to?

Quilty Hugs,

Sunday, September 29, 2013

DJ TRIANGLE: LS10

Today's plan was to embroider because it is Slow Stitching Sunday! Didn't happen... maybe later. Instead, I made a DJ Tri for the TOW on the DJRetYahoo list. The block was already printed on copy paper in my folder so I just used that. Wow... sure did miss using FP for the PPing!
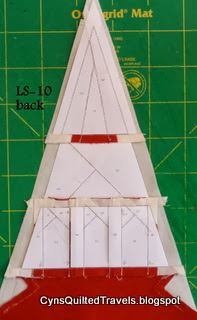
DJ LS10
DJ-LS10: back
Until next time. . . It is a lovely day and my patio beckons. Time to grab some yarn and head outside to hook for awhile. What are YOU doing this Sunday?
 

I did a little applique on this Tri, so that is my Slow Stitch for today. Linking to: Kathy for Slow Stitching Sunday.

Quilty Hugs,

Friday, September 27, 2013

DEAR JANE #D11

The DJ block assignment for this week's BOW is: D11. The TOW is: TR11. Not sure I'll get the triangle finished by Sunday night, but the little block is done. If you are working on a DJ project, you might like to join us on the DJRetreatYahoo group... we give each other encouragement and tips.

DearJane D11 - completed 27Sep2013
It wasn't until AFTER I made this block, that I thought of a much easier way to make it!  A much more efficient use of my time would have been to piece the center and stitch the four "star points" on, then simply prep those edges and applique to a foundation square; add little triangles and done! Live n learn.

Until next time. . .I'm going to start that triangle... what are YOU working on?

Quilty Hugs,

Sunday, September 22, 2013

FABRIC BOX... Easy, Quick & Link + Tut

I saw the cutest little Fabric Box on FB earlier today. I just had to make one! Only took about one hour to create.
Fabric Box ~ A great gift idea!
A fabulous and very well written tut is HERE.  The only thing I changed: Added edge stitching right at the folded edge on the bottom. To me, it "sits" better.
 
To be finished, my inside seams need tacking down and the outside points need a couple of buttons. Or maybe YoYo's if I can't find blue buttons.

Thank you for stopping by to visit. Hope you enjoy making this tiny treasure.

Quilty Hugs,

Saturday, September 21, 2013

GIFTY SURPRISE... Crocheted Spool Pin Doily

Because I was a couple of weeks tardy returning a Siggy recently, I am also sending a little giftie.  A hand crocheted Red Spool Pin Doily is on its way to Julia in Spain. Hope she likes it.
Spool Pin Doily. Red for a FW machine

Crocheted Spool Pin Doily: about 1.5 inches across

Pink SPDoily on my Janome6500
Thank you for popping in to visit.  Until next time. . . I will be re-organizing my pattern files and finishing up a DJ block. What are YOU up to??

Quilty Hugs,

Friday, September 20, 2013

SIGGY

A gorgeous lavender Siggy has arrived from Spain. Thank you so much, Julia.  She did some wonderful embroidery! Sew pretty.
DJ Siggy - International Swap
Until next time... I will be working on the Mobile Tree House. What are YOU working on??

Quilty Hugs,

Thursday, September 19, 2013

STRIP N STRING FRENZY...Fini!

Guess you could say I'm all strung out! lol. All 66 string blocks are sewn and trimmed --twice as many string blocks as crumb/strip blocks, plus 4 in case I decide to make pillow shams. I'm loving these string blocks. Wonder how many I'll have to make before I get this stringy business out of my system?! BTW, all 97 blocks were made totally from SCRAPS. Nary a piece was bought or cut from stash... all from my "Bits, Bobs n Strip Bins."  Just one thing, though, how come I still have the same amount of scraps as when I began? How is that possible???
66 String Blocks & 31 Crumb/Strip Blocks - totally from scraps!
Missy is helping, or supervising.
From THIS. . .
To THIS
To THIS... TaDah!
Tonight's project:  To finish prepping a DJ block for the DJRetreat BOW that is due on Sunday... this one has 16 melons to applique! I better get with it. What are YOU working on???

Thank you so much for stopping by. . .

Quilty Hugs,

Wednesday, September 18, 2013

HOOKY... Some Ripples

Missy needs an afghan for her new bed in the RV.  Enter a new hooky ripple project: Ripples For Missy.  I enjoy crochet a lot... a whole LOT! lol. It is relaxing and keeps my hands busy doing something constructive.

The repeat I am using is 12 stitches: 4 dc on each 'side,' 2 ch to skip for the decrease,  and the increase at the 'point' is 3 stitches in the center stitch. There is no pattern; I just made it up.

If you are interested in the ripple stitch, there is plenty of info on the Net -- Google: Attic24 -- and YouTube. I've learned a ton on YouTube, especially from the CrochetGeek. [the link will take you to a tute on ripple crochet]

Both quilts for the people beds in the camper are coming along pretty well. Thirty crumb blocks are done and today finished up 31 string blocks -- just 30 more to go.  I'm so happy I decided to add string blocks to the crumb blocks... so much more interesting... I think.  I love string piecing. It is time consuming but I really like the visual results. Won't be long now... fingers crossed!

Thank you so much for dropping by to visit. . .

Quilty Hugs,

Tuesday, September 17, 2013

TRIMMING STRINGS FOR ACCURACY... Paper & Ruler!

The phone book pages were cut precisely at 7 inches square. But after sewing, the block shrunk... just slightly and not evenly... maybe because I was sewing on the diagonal? Don't know, but I changed how I trimmed the blocks:

With paper side up:
* First cut - Use a square ruler and cut along first two paper edges.
* Second cut: Use lines on Ruler for final two cuts.
Yippee... perfect squares! See the second photo below... there's a tiny smidge of fabric sticking out beyond the paper! If I had cut all four sides at the paper's edge, the blocks would be too small and not square.
First cut: at paper's edge
 This is a great use of a Phone Book that otherwise would have been thrown into the recycle bin! If they are gonna throw it on my porch FREE... then I am free to use it however I want! lol
2nd cut: used markings on Ruler!
EDIT: Good idea to recheck the block's size after removing paper and carefully pressing. Thank you, Sheila, for the great tip!

Today is friendship group so I better get packing and ready. Will take some FP, fabric and prep for applique on a DJ block. No carrying of a sewing machine for me today... had a flu shot at doc's yesterday and my left arm feels like it is full of lead!

Thank you for popping in to visit!

Quilty Hugs,

Monday, September 16, 2013

STRINGING THE CRUMBIES... Just A Stringer At Heart

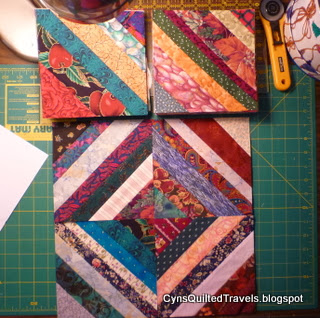
Something was missing with my crumb blocks. Couldn't put my finger on it. Then I thought STRINGS! Yes. That would work. Make string blocks, cut on diagonal, and add the resulting triangles to the crumb blocks. Me likey! What do you think... you likey, too?
Strings+Crumbs = Interesting Square in a Square
The details: Crumb blocks are 9 inches square. String blocks are 7 inches square and cut on diagonal. This makes an interesting square-in-a-square and I like it.

Last week at ARETOY Quilt Shop, Rosemary helped me find the perfect fabric that looked great with my crumb squares. Friends are wonderful! I wondered how many yards to get; how much would I need? Hard question to answer when many design decisions were yet to be made. Answer? Buy the whole bolt! lol

Isn't it wonderful how strings go so well together? No rhyme or reason... just stitch them on and they play nice! Love it. They look so straggly, then trimmed up they look good... put in a quilt block and they look grand! Guess I'm just a stringer at heart.
Strings trimmed
Cut diagonally; add to crumb blocks
That's all for now... I'm headed back to my machine to sew a little more. What are you up to?

Thank you so much for popping in to visit! If you enjoy reading my posts and seeing the pictures, please leave a comment -- I would love to hear what you have to say. Thank you.

Linking to: Connie at Freemotion by the River

Quilty Hugs,

Sunday, September 15, 2013

POINTS, POINTS, POINTS...it's all about the prep! DJ TR8 Brigadoon


My DJ triangle for this week's BOW is TR8 Brigadoon.

Lately my points haven't been as nice and pointy as I would like. Then lightening struck last weekend and I changed how I do the prep. The first steps are the same... it's the final one that made the BIG improvement and I have a block to prove it! lol.
* Make FP template & cut out [smooth edges with emery board if necessary... go lightly here!]
* Iron FP to WS of fabric
* Cut out around template adding 3/16 - 1/4 " seam allowance by eye
* Press s.a. over template all around... a smidge of starch is really helpful here! I use spray starch or spray sizing that I spray into the cap and dap on with a small brush.
Diamond on left prepped NEW way; the one on right, the old way
The NEW part:
* Points... carefully fold just the 'ear' of the point back over on itself... please see pic below ... you might have to nip off a few threads. Carefully add one drop of Roxanne's Glue Base-It and press in place. Voila! Perfect point and ready to applique. Remove the FP either before or after appliqueing... both work equally well. I prefer to remove it and then sew.
Left point prepped & right one is not... yet
This looks acceptable to me and is ready to be sewn down
Sewing the point... NO ends to fight or tuck under! Love it.
[don't mind the needle 'parked' off to the side... I needed both hands to take picture.]

Previously I had always needle-turned the final edges of the points which sometimes looked great and other times a bit wonky! See the upper diamond on the triangle below? Now that's one wonky point! Yuck... but I'm not doing it over.
Wonky/wobbly point on top little diamond.. the others are ok
Sewing, quilting, knitting, tatting, crocheting... all of it... it's all about the journey for me. I try to get better as I go; I try to do the best I can today with the skill set that I currently possess. Maybe next week I will be able to do it better but for right now "my best is good enough"!

That's all for now. I hope you enjoyed reading how I prep my points for applique. Thank you so much for dropping by.

Linking to: Kathy at Slow Stitching Sunday.

Quilty Hugs,

Saturday, September 14, 2013

DJ BLOCK # D5


TaDah!! Another DJ block completed... yippee! This one is D5.
Dear Jane #D5
Had a bit of fun fussy cutting this fabric. My goal was to get some "curvy" feeling in this very linear block. I love this fabric. The repros are so gorgeous.

I strip pieced the interior 'sashings and cornerstones,' and PP'd the outside triangles with FP printed from the DearJane software [Electric Quilt]. It's not perfect but it is done!

Leaving the FP bits in place on the outside corners helps give stability to this tiny block as it sits and waits to be sewn into the main quilt.  Also, I leave a bit extra on the outside edge... about 1/8 inch ... and trim this right before sewing on the sashing. For me it's all about protecting the edges of these tiny blocks. This is how I pressed it:

 
Managed to get a triangle finished as well, but will share that in another post. Until next time, thank you for popping in to visit. See you soon. . .

Quilty Hugs,

Friday, September 13, 2013

DJ SIGGY FLIES TO SPAIN

One more little siggy signed and it is on its way to Spain!  The siggys are made from the Dear Jane block #D13. Each person embellishes the center square with their own design or artwork.
Pigma Inks, Prym color shading, Kitty stamp
Only about 20 left... when they are gone that will be it for me. No more siggy swapping.  It's been wonderful to share and swap them these past 10 years [about] with people from all over the world, but it's time to move forward and put them all into a quilt! It has been a lot of fun, though.

My crumby blocks are being trimmed and I'm working on more DJ blocks and triangles - I will finish this quilt! lol.  What are YOU working on?

Thank you for stopping by to visit... hope you have a wonderful weekend filled with stitching fun!

Quilty Hugs,

Sunday, September 8, 2013

DJ BLOCK G-7: Piecing & Pressing Pics

TaDah! It always feels good to get something done and marked off one's To Do List! G-7 is this week's BOW on the DJRetreat Yahoo Group.

G-7 is the center block in the Dear Jane quilt. Please find below pictures on how I chose to construct it and how I pressed it.
Applique the arcs; PP the set in strips; machine pieced
PPing with FP allows pressing options... love that!
Missy is supervising. ;)

Hope you had a lovely weekend. Thank you for popping in to visit!

Quilty Hugs,