Tuesday, October 30, 2012

SIZZIX HAS ARRIVED!

Recently I ordered a Sizzix Die Cutting machine from Amazon and it is here already! Wow - fast. I'm feeling dumb this morning, though, because I forgot to order some dies! lol. Perhaps some are available at my local Joann's. Guess where I'm going today?
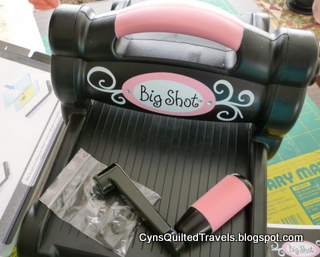
Sizzix... fresh out of the box!
And... I need one more thing: Ebony Love's new book, "The Big Little Book of Fabric Die Cutting"! Can't wait to read it and learn about die cutting from the expert. Ebony has a wonderful blog and also shares many 'how 2' vids on YouTube.

Linking to Connie's  Free Motion by the River

Until next time. . . I'm off to buy a die or two, then work on some DJ blocks  -- what are YOU doing today?

Quilty Hugs,

Monday, October 29, 2012

"STAR POWER" - I WON!!!

Wowzer!!! I won the drawing at Bea's for "Star Power" by Judy Martin for EQ7. Thank you, THANK YOU, Bea! I am thrilled to my toes.
Star Power by Judy Martin for EQ7
Please be sure and visit Bea's blog - especially on Tuesdays - Bea writes wonderful and easy to understand tutorials for EQ7. Just last week she taught us all how to d/l and add manufacturer's fabric samples to our own custom Library! Excellent. Thanks again, Bea. I am so excited!

Until next time. . . I am going to install Star Power and then prep a few Dear Jane blocks; what are YOU going to do today???

Quilty Hugs,

Saturday, October 27, 2012

JANE AGAIN: M-3 & some thoughts on PPing

Poor Jane sat in a box for a few years. Some of her was even in a 3-ring binder. Sew... a couple of weeks ago I began making DJ blocks. In earnest! lol. This week was fairly productive. Completed M-3 on Friday:
DJ Block M-3. Completed Friday, 26 Oct 2012
Liz on the DJRetreats Yahoo group divided the block into quarter-sections so it could be PPd! Just draw a 'plus' sign through the block. Wow, that's brilliant! Thank you, Liz, for the super idea. Sew... I did, too:
Piecing tips: Block has been bisected - note the lines thru the diamonds & center tiny square.
I added "hash marks" to help line up the sections when putting the quadrants back together.
Piecing tips: Center 4 sections are PPd. Note the 2 templates in LowerLeft corner of this pic. That is how the "frame" was sewn on.
Lining up the center seam. Note the 'cut-a-way' in the very center - all seam allowances were graded and this area to be covered by appliqueing the final tiny center square.
Lining up the center square template to double check for size and placement.
This little block certainly isn't perfect, but it is DONE! Finished block picture at top of this post.

Until next time. . . I have two more triangles to finish up. Then I need to rustle up some grub for dinner because World Series Baseball starts in 90 minutes!!! What are YOU doing today???

Quilty Hugs,

Friday, October 26, 2012

MINI ARRIVES!!

A Friendship Embroidery Mini Quilt has arrived at my home all the way from Tasmania, Australia! It is so pretty. I love everything about it. Thank you, THANK YOU to Jenni for making it. Jenni even put hanging sleeves on the back and a label! Look close for the darling little kitty buttons Jenni added. Really high on the Cuteness-Scale! Jenni wrote a lovely note and included a picture of where she lives. Lovely.
Quilt designed and made by: Jenni K., Tasmania, Australia, Oct 2012
Jenni made and included two NeedleCases. She said one is to keep and one to share with a friend. How sweet is that?! I can hardly wait to hang this gorgeous quilt up, but want to finish the re-do in my sewing room first. It will look fabulous, but I want its new home to be on a clean and freshly painted wall. Yippee Skippee. I am so happy that I just don't have words to express it!
Friendship Embroidery Mini by: JenniK.., Tasmania, Australia.
Until next time. . . what are YOU up to???

Quilty Hugs,

Thursday, October 25, 2012

UPDATE: 5 Min Choco Mug Cake

A friend wanted to try Splenda in place of regular sugar in yesterday's recipe of 5 Min Choc Cake in a Mug. Hmmm, I didn't know if it would work so I tried it. Yummy!
Dumping the MugCake into a bowl helps it cool down quickly - some ice cold whipped creame helps, as well.
I did make a few modifications to the recipe just for fun: reduced oil from 3 Tblsp to 2 AND Added 1 tsp of Peanut Butter & about 1 tsp of Natural Agave Syrup [in with the liquids].  I used 4 Tblsp of Spenda instead of regular sugar. I stirred all this together with a fork in a big mug and cooked it in the microwave for 3 minutes -- 2 1/2 minutes might have been enough b/c my micro is very high wattage.  This quick cake was delish and I even added a squirt of Whipped Creame on top... made for a better picture, don't cha think? lol. OK, OK, I confess, I didn't have any ice cream.
in the Micro
Done cooking. Cake fell a little
 Until next time. . . I am going to work on a couple of DJ blocks and then turn on Game 2 of the World Series -- what are YOU going to do today??

Quilty Hugs,

Wednesday, October 24, 2012

5 Minute Chocolate Cake . . . for one! ;-)


Wow, I was just telling someone about this recipe post, but when I went to look for it, I found it still in the DRAFT folder! Yipes. So, without further ado - and several years later... here it is:

Quilty hugs,
Cyn; -)

5 MINUTE CHOCOLATE MUG CAKE

4 tablespoons flour
4 tablespoons sugar
2 tablespoons cocoa
1 egg
3 tablespoons milk
3 tablespoons oil
3 tablespoons chocolate chips (optional)
A small splash of vanilla extract

1 large coffee mug (MicroSafe)

METHOD: Add dry ingredients to mug, and mix well. Add the egg and mix thoroughly. Pour in the milk and oil and mix well.. Add the chocolate chips (if using) and vanilla extract, and mix again.

Put your mug in the microwave and cook for 3 minutes at 1000 watts. The cake will rise over the top of the mug, but don't be alarmed! Allow to cool a little, and tip out onto a plate if desired.EAT ! (this can serve 2 if you want to feel slightly more virtuous).

And why is this the most dangerous cake recipe in the world? Because now we are all only 5 minutes away from chocolate cake at any time of the day or night!

Sunday, October 21, 2012

DEAR JANE: LS-13 Triangle

This is the Triangle for the DJRetreats Yahoo Group's BOW due by midnight tonight. For some reason the PPing didn't go as smoothly as I expected. lol. The melons - with a couple of points left to applique down - are a bit wonky... again! Yuck. Perhaps beginning earlier in the day, or even earlier in the week would be a solution to the 'wonkiness'.
DJ Triangle LS-13: prepping the melons
DJ Triangle LS-13: appliqueing the melons
Might not get the D-4 block assignment completed. And, D-4 has four more melons!  That will depend on how late the baseball game runs.  BASEBALL just started and I need to go watch and root them on!

Until next time. . . what are you working on today???

Quilty Hugs,

HAPPY MAIL & Quick n Easy Coasters

Donna, of BrynwoodNeedleworks, sent me a surprise bit of Happy Mail. A set of colorful charm squares and a sweet note. Thank you, Donna! I have already put the charms into a project.

Happy Mail - surprise gifty from Donna
The pic below shows some very quick to make Coaters. Take 6 charms for each coaster: fold 4 of them in half, arrange, stitch and turn. I like to zigzag the edge before turning - they launder better that way.  These are so fast, so easy... too cute. Make great gifts.
Coater on left shows zigzagged edge & Coaster on right is turned right side out - finished.
Coasters slip over the foot of a wine glass making them very useful at parties.
It was really really hot a few days ago. Got up to 90 INside the house! Thank Heavens for fans. Below is Missy's solution to keeping cool while napping. I just can't resist sharing this cute picture of Missy stretched out over the edge of one of her beds taking an afternoon snooze. So darling!
Missy stretched out trying to get cool on a hot day.
Until next time. .  . what are you working on today???

Quilty Hugs,

Saturday, October 20, 2012

RSC12 - Brown bits

The October color for Saturday's RSC12 is BROWN.  I have quite a few little brown bits leftover from a placemat project. Not sure how many are in the pile shown below, but there are a lot of them!  Certainly enough to be stitched  together and turned into something useful like a DishMat.  Check out Connie's great tute on how to make one; and here's one I made several months ago. And this is a good project to practice my FMQ on.
Brown leftovers from the Daily Grind fabric
Linking:  Hop on over to Angela's at SoScrappy to see what everyone else is doing with their brown scraps.

Until next time. . .what are you working on today???

Quilty Hugs,

Thursday, October 18, 2012

EQ7 TUTEs Just Beginning. . .and a Linky Party

What fun! Bea at BeaQuilter, will be writing instructional tutes about EQ on her blog. She has posted two so far. They are wonderful! Thank you, Bea.

When I was studying EQ7 at QU last August, I designed a quilt using multiple borders. The RailFence block I started with was altered and additional blocks were set into the border. This is the end result:
Original Design using EQ7 - Aug 2012
Linking up with BeaQuilter. There is also a Linky Party on Bea's site... go see what everyone else is up to. Fun!

Until next time. . . I'm going to be making FP cutouts for some DJ triangles and sewing up a few more napkins -- what are YOU planning on doing today??

Quilty Hugs,

Sunday, October 14, 2012

DEAR JANE - A Triangle BR-1

Today sees a triange added to my stack of completed DJ blocks. This one is BR-1.
BR-1: Bottom Row #1 DJ Triangle
Before taking any more pictures I plan on creating a triangle template to "lay over" the triangle block. It is my hope that this will produce neater and better pictures. Everything is a learning experience, ya?!

That's all for today. Until next time. . . hope you have loads of time to stitch something that makes you happy!

Quilty Hugs,

Wednesday, October 10, 2012

Java Time... Need HELP, please

I really can use some HELP... read on:  My DD loves everything to do with coffee: drink it, decorate with it - everything! So when I saw the "Daily Grind" fabric line it was a natural to buy some. The placemats are all pieced and the first one is basted.
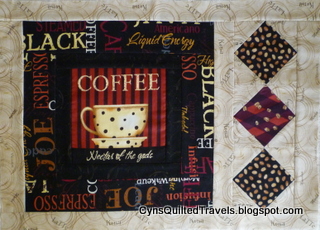
"Daily Grind" java themed set of 4 placemats
PROBLEM:  My first quilting task will be to anchor everything with a little ditch work, but then what??? I need some suggestions, PLEASE!  I think maybe 3 curving lines coming up out of the cups like "steam"... but that's it. After that, I am drawing a blank. IF I do quilt some steam lines above the cups, will it be necessary to do a tight b/g fill behind it? Not sure I can do that yet.  I am still 'meandering' and haven't graduated to 'stipple', yet. lol.  As you can see [below] every center square is slightly different.
 
I think part of the problem is that my mind still thinks like a Hand Quilter - I really need to work on that.


I would very much appreciate hearing how others would quilt these placemats. Thank you for any help or advice you can offer. Oh, I should mention, these will be machine quilted - they are batted up with Warm and Natural, and they will be a gift... guess that's why I'm freaking out a little bit over the FMQing. Thanks again.

Until next time. . . I'm keeping my fingers crossed that someone out in blogland has a solution!

Quilty Hugs,

Sunday, October 7, 2012

Dear Jane... J-4 done!

One more block completed for the DJRetreats BOW [Block Of the Week]... and it's not even midnight yet. Midnight is our deadline.
Dear Jane: Block J-4
Using FP-PPing, I made J-4. The fabric reminds me of some ties my Granddaddy wore in the 1950's. Now that's a while ago.  Even though this is a very simple block, I added two drawn lines to connect the sewn strip to the edge so when putting the two triangles together the seams would line up. I'm trying to knock the cobwebs off my PPing skills in preparation for the really difficult blocks to come.
Two added lines to help with alignment

Pulling threads to straighten edge of Fat 8th... wow was it crooked

Left two small pieces of FP to remind me the s.a. has an extra 1/8"
Because it might take me a while to finish DJ, all the new blocks I'm making have an extra 1/8 inch s.a. on the outside. I want to be able to freshly trim them when putting on the sashing. Does anyone else do this?

I need to make a quick run to the grocery store -- wowzer, but my pantry is B.A.R.E. -- then it will be time to pack up and leave for the Baseball game! Yippee Skippee... golly, but I do love baseball. And, the World Series is just around the corner. Oh boy!

Until next time. . . I will be working on some placemats tomorrow - what will YOU be working on?

Quilty Hugs,

Cyn; -)


Saturday, October 6, 2012

RAINBOW SCRAP SAT: October is Brown!

Not a whole lot accomplished today. But, with a ton of prep work behind me, the next couple of days should be very productive... I hope. *g*

Even though it is late, it is still Saturday [somewhere!], so I will share what I worked on today that is this month's color: Brown.
Taming a "just pressed" seam.
A nice little pressing trick I learned a long time ago by watching Sally Collin's DVD about precision piecing, is while a just-pressed piece is still very warm, smack something straight on top of it and add weight. Don't move until cool.  It is amazing how this trick tames an unruly seam allowance. Thank you, Sally!
Seam allowance after pressing, adding weight, allowing to cool.
My real "claim to fame" today was making a ton of HSTs... all in cream, brown and black. Sorry no pic. It's late. I'll share them later.

Linking to: SoScrappy. See what others have done with their browns.

Until next time. . . I hope you have a lovely Sunday and find time to sew up something you love!

Quilty Hugs,

Thursday, October 4, 2012

GIVE-A-WAY & A Nifty Corner Technique

Today I'd like to share with you one of the ways I snowball a square: I use my B-60 C-Thru Ruler b/c it is thin and a drawn line is more accurate. I lay the ruler exactly point-2-point diagonally across the smaller square and draw a line with a .005 Micron Pen. The tip of this pen is very fine but "off sets" the line by a tiny smidge. This smidge is important.  Now just stitch "right ON the line" you drew and your corner will be perfect... NO fudging is needed.  I use this technique when accuracy is really important, otherwise I give the little square a casual finger press and sew next to the pressed line.
Marking diagonal line to snowball a square
 
After stitching, press seam flat to set the stitches and fold over to create the perfect corner - both grainlines will remain true. Trim excess 1/4" away from stitching line.  But, unless I am in a big hurry, I usually stitch a second time 1/2" away from the first line to create tiny HSTs to throw into my Crumb Box.
This technique produces a square corner
Now it's back to the machine to snowball a few more squares for a placemat project.

A new Give-A-Way is happening over at the Quilting Lodge blog. Go have a look see and check out the great quilt Vickie just quilted on her LA. Good luck, everyone!

 Vickie asked what our favorite notion is and although I have more than just one, a current fave is absolutely hands-down the Clover Needle Threader. It makes easy work out of threading a size11 needle and sure helps these old eyes.  What's your fave notion???
Needle Threader by Clover - great notion!
Until next time. . . what are YOU working on today???

Quilty Hugs,

Wednesday, October 3, 2012

WIP Weds... a small project, but 1st DEBATE is tonight

As it is WIP Wednesday, I was going to sew, but with the Presidential Debates beginning tonight I will be tuning in to the Tube.  If they show any commercials, perhaps some sewing can be squeezed in.
Placemats n matching napkins: new project
 A old project was re-started yesterday and I hope to share it with you very soon. . .Until next time, I hope you have loads of time to create something that makes your heart sing!

Quilty Hugs,