Friday, June 29, 2012

GIVE-A-WAY Happening at Quilting Lodge

Hurry on over to the Quilting Lodge - a
GIVE-A-WAY
is just beginning. Lots of chances to win, just follow the easy rules. The drawing will be July 4th and winner announced on July 5th.
 Good luck, everyone!


That's all for now... until next time. . .

Quilty Hugs,

Thursday, June 28, 2012

CROCHET SCRUNCHIE & 2 Menu Ideas: Soup n Salad

Spent most of today working on files. Yuck. But it is a task that must be done from time to time. Isn't it amazing how the "paper chase" can drown a room?

It's almost bedtime, but wanted to try a quick crochet project: A little scrunchie for a twist, or ponytail, or any similar style that holds hair out of our faces when we are playing sports, or just scrubbing the floors. Easy peasy: DblCr + Ch1 over hair band all around, sl st to join. Optional "loopy" round: Sc in first space, Ch5, Sc in same space; repeat all around and join with sl st and fasten end. Ta Dah. Takes about 15 minutes - tops!

The menu ideas are: Split Pea Soup cooked with a few veggies and Amaranth. Amaranth is an ancient grain that is chock full of nutrition and fiber. Yummo! The salad was made from diced cucumbers, red bell peppers, green onions. A little sprinkle of herbs, garlic, and rice vinigar. Served over red-tipped lettuce. Made for a nice lunch.

Dinner was a dry-saute [no oil] of veggies on hand that I turned into a Marinara Sauce and served over WholeWheat Pasta. I was sorry not to have had any mushrooms to add. A sprinkle of Nutritional Yeast [in lieu of cheese] and voila! Dinner.

That's it for tonight. Thank you for stopping by for a visit. This weekend I will be busy making about 25 MugRugs for DD's office crew..... if anyone has ideas to share... now's the time! *g* Oh... and they must be finished by Sunday night, but there's no hurry or pressure, right?!

Quilty Hugs,

Wednesday, June 27, 2012

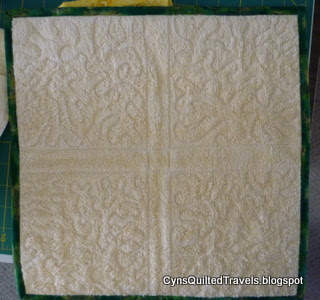
TA DAH! I FMQ this little sucker...

TA DAH! I did it - FMQ'd this little Dish Mat. Is it perfect? NO, but it's a beginning. Just need some practice. I usally 'cop' out and use my walking foot to machine on a grid, or just do simple wavy lines. Not this time. I bit the bullet and did some meandering! I can't wait to finish another top so I can try my hand at FMQ again... you know, while the thrill is still with me. LOL. Sorry for the bad picture. Note to self: must practice photo skills, too.
D9P Dish Mat, FMQ and Machine Sewn Binding
Today - for the second time - I put the binding on totally by machine. Again, it is not perfect, but it is acceptable and I don't think the pots n pans will mind as they sit on it to drip dry!  I missed the "ditch" in a couple of places, but with practice and patience that should improve also. I am happy with the corners. I'm a corner nut! *g*

Hmmmm, I'm wondering if . . .
Free Motion Quilting = FMQ
then Quilting with a
Walking Foot = FMQWF.
What do you think?

The backing is just a recycled towel. It was a little needle resistant, but I took it slow and - yippee! - there are no eyelashes on the back.


Big THANK YOU to Elaine, for the push to do this. Elaine said something wonderful to me the other day: "Give yourself the right [or permission] to play". Excellent advice!

Thank you for stopping by today for a visit. Until next time. . .

Quilty Hugs,

Tuesday, June 26, 2012

ARTICHOKES, TORTELLINI & SPINACH... Yummo

This is a super quick post to share a salad I recently whipped up.  It is Vegan, quick, easy and tasty.  But before I do that I want to thank the many of you who have written me privately to wish me well as I begin this new doctor-ordered eating regime. I really appreciate your tips and loving support. Next post will be quilting! *g*

Vegetable Tortellini - cook al dente
Baby Cuke - diced
Edit: Baby cuke = Persian Cukecumber, but any will do. Sorry for confusion. Thanks, Elly.
Green Onion - sliced
Bell Peppers Red/Green/Yellow - chopped
Artichoke Hearts - quartered
     MIX drained Tortellini and prepared veggies together.
    ADD herbs/seasonings of your choice - I used Trader Joe's 21 Seasoning Salut -
    ADD a small amount of Lemon Juice and Oil Free-Sugar Free Italian Dressing.
   TO SERVE: Put a handful or two of Fresh Baby Spinach leaves on plate. Spoon Artichoke-Tortellini mix over Spinach. Top with diced Roma Tomato... Yummy!

Ok... it's back to sewing. Just wanted to share my salad creation with you. I'm working on a mini quilt and plan to have it ready by tonight.  Thank you for stopping by for a visit. . . until next time,

I am linking to Connie's linky party at: Quilting By The River.

Quilty Hugs,

Saturday, June 23, 2012

Rainbow Scrap Saturday - Purple, Crazy, 'n Wonky

Whew! Almost didn't make it in time. lol. Here is my RBSC2012 Block for June, which is Purple! I realize I have almost NO purple scraps, so this little block was a challenge. I stretched a few of the pieces b/c they lean to mauve, lavendar, etc... but it's all good and hopefully it reads as purple-ish.


This little block will change considerably before it goes to live in a quilt with other blocks. I'll write more about that later.  Below you can see the total of the scraps I had to work with... not much:
There is no pattern for this block. It is a combo of crazy, crumb and freestyle... just add any ol' piece.
Begin with a scrap that has several sides. I choose five. Stitch on a scrap.
Trim the edge. Repeat. Sew. Press. Trim. Repeat. All around the block. It doesn't make any difference if you go around clockwise, or catty-whompus [is that a word? lol]. Just stich the pieces on and then trim a straight edge somewhere.
Keep adding and trimming until you obtain a sufficient amount and can trim to your desired size. I chose 8 inches. Check out what every one else is doing at SoScrappy for Rainbow Scrap Challenge Saturday.

This isn't quilt related, but I've decided to begin sharing some of the meals I am creating for my new-to-me totally plant based diet. Doctor says do it, so I am.
Above is a meal I made from 1/2 C Brown Rice and 1/2 C Brown Lentils [both steamed ahead of time... I keep some in refr and/or freezer]. Dry saute a mix of fresh veggies. I chose Onion, Mushroom, Squash [green and yellow], and right before the veggies were crisp tender, I added a handful of Red Swiss Chard and another of Kale. To serve: mound veggies over rice/lentils and top with a diced Roma Tomato. Seasonings were very simple: Garlic, Liquid Aminos, a splash of Trader Joe's 21 Seasoning Mix.

Please keep your fingers crossed. This is all very new to me, but I prefer doing this over the alternatives of more meds, etc..  If anyone else out there is also eating a totally plant-based* diet [vegan], I would love to hear your thoughts, comments, tips, etc. Thank you.

That's all for today. Thank you for stopping by for a visit. Until next time. . .

Quilty Hugs,

* Totally plant-based means NO animal products of any kind, including dairy, cheese, eggs, fish, honey, etc. Also, NO oil, and no processed foods, with exception of minimally processed foods like tofu and those in limited amounts. Also, for right now, NO nuts, seeds, avocados, or anything "white".

Wednesday, June 20, 2012

HEXIE PROJECT - All finished

The hexie I shared with you on Tuesday has been finished, mailed, and received so it is safe to post the whole picture. A little Mug Rug for the Inklingo Mug Rug 2012 Swap, hosted by Jillian. Thank you, Jillian for all your time and hard work. This was a fun swap and another opportunity to use Inklingo.

What I used to make it:  Inklingo 1/2 inch hexie collection; Sulky Fabric Solvy [to transfer the words to the background without marks - love this stuff!]; scraps of store-bought bias piping w/cord removed [works well for a small quick amount of bias stems, etc.]. Hexie flower is hand pieced and hand appliqued to b/g. Verse is hand embroidered with floss. No binding, just layer, stitch and turn. Quilting: FMQ [not perfect, but I tried it and just need to commit to practicing more.]

From the scraps I made the little matching coaster shown in pic above. The bright green stripe fabric in the coaster is the backing fabric for the mug rug.


That's all for today... until next time I hope you have loads of time to stitch!

Quilty Hugs,

Monday, June 18, 2012

TINY HEXIES make A Tiny Flower

These little 1/2 inch hexies were fun to play with. I used Inklingo to print the shapes on the pink fabric, cut them apart and hand stitched them together. This first pic shows the beginning of one edge pressed under to get ready to applique.

As I was hand-piecing, it looked like the pic below.  Look closely and you can see the faint blue stitching lines and the "x" for the crosshairs... that's how the block comes together so perfectly every single time. Love it:

But my favorite is how it looks on the backside of the block after pressing. I just get a real kick out of how the seam allowances at the interesections twirl around... too cute. Ok, I don't get out much! lol

This is a super shortie post tonight. Time to get packed up for Friendship Group tomorrow and then hit the hay -- I've been up since 4:15 this morning! I think I have holes in my head! lol

Linking to Connie's Linky Party at:  Quilting By The River

Until next time. . .
Quilty Hugs,

Saturday, June 16, 2012

HAPPY MAIL. . . A sweet MugRug from Sherrie

Friday's post brought some Happy Mail: A pretty little MugRug from Sherrie R. in Massachusettes. Both of us are in the Inklingo 2012 Mug Rug Swap. Thank you, Sherrie. My new little mat is already doing duty in my sewing room. The colors are so fun... love the circle fabric! Sherrie even included two packages of Twinings Tea in her gift. Nice!  I will post a picture of the one I made and sent to Sherrie, but not until she sees it first. *g*
MugRug, InklingoSwap2012, made by: Sherrie R.
The swap was a small challenge to design and use one or more Inklingo shapes to make a mini quilt in a MugRug size. Our fearless-leader was Jillian of DakotaEssense. Thank you, Jillian, for all your time and hard work. 

This is a super quickie post today - some OB blocks are calling my name.  Time to get back to these poor little OB pieces that have been languishing in a box for too long. They need to come out and play and get sewn into a top! So, until next time. . .

Quilty Hugs,

Tuesday, June 12, 2012

NOTION TIME... love these thin thin pins!

As promised, this is a short post about my new favorite PINs.  I discovered these at the Quilter's Cottage in Fallbrook, California. They are very very thin and very sharp. Their size is 0.4 mm. I tried to get a close-up of the packaging so it would be readable. They are a bit pricey, but worth it IMHO. The tiny glass-heads make them iron-friendly, too:


That's all for now.  Until next time. . .
Quilty Hugs,

Monday, June 11, 2012

CATHEDRAL WINDOW PINCUSHION... Quick, Easy, Fun

This sweet pincushion sews up pretty quickly and makes a nice gift for a sewing friend. Or... even make one for yourself! Now that's a novel concept, eh?! I had fun sorting and picking through my buttons trying to find a pair to sew in the center. It was a nice trip down memory lane as so many of the buttons were removed from past garments... a couple from my Great-Aunt's garments.

My dear friend Rosa posted/tagged a picture on FB and that's where I first saw this pincushion. A little clicking around produced THIS LINK where there is a great tutorial, so I won't re-create the wheel by giving directions.  The fabric I used is a charm pack from the 1862 Battle Hymn by Barbara Brackman for Moda.

TIP:  I created placement guides by pressing two light creases on the diagonal of the large plain fabric square. This little trick really really helps to center the folding template guide and get it dead-center! That's my contribution to this project. Below are a couple of pics showing where I made the folds.
See below how easy it is to center the manila folding guide square? It's right on!

The pincushion back is a four-patch. I left part of the final seam open for turning the pincushion. I prefer not to leave an opening on the edge... I like it in a seam, as I think it hides better.


Can you see the tiny space that Missy leaves me to do my pressing in? Little kitty likes to drape herself over most of this already tiny ironing space. The flash on the camera "disturbed" her... trust me, in a few moments she was back relaxing and dozing away on the pressing board.


That's it for now. Next time I will share some FAB straight pins that I found. They are sooooo thin and have very sharp points. Love them!

Until then. . . Quilty Hugs,

Linking to: Connie's Tuesday Linky Party

Sunday, June 10, 2012

BOBBIN-BUDDIES. . . Easy and Quick To Make

Bobbin-Buddies are quick and easy to make. They can be fairly pricey to buy in the notions department, but inexpensive to make.


Here's what ya need and all easy to find at the hardware store or a big-box store like Home Depot, Lowe's, etc:

* 3/4inch by 1/2 inch clear plastic tubing [this is the outside/inside measurements of tubing]. Find this tubing in the plumbing department. You might also find some where aquarium supplies are sold,
* Xacto knife or something to cut rings/slices with.


Using an Xacto knife cut off 1/4 inch "rings" from the tubing. Cut through one side of the ring so a bobbin can be inserted. That's it! These are so handy. Below is a closeup of the kind/size of plastic tubing I bought:


I used Resolve to remove the black manufacturing marks from the tubing, or you could just cut around it... but I was being "thrifty". *g*


The Xacto knife was a bit difficult for me to handle so I tried a carpet knife [orange in upper left corner of picture] and finally a pair of scissors. Bigger scissors would have been better. I took about ten feet of tubing to my Tuesday Friendship Group meeting and we all made some. Great fun!

Hope you are having a lovely weekend and have some time to stitch. I just made a pincushion this afternoon [which I will share next time]. Right now it's off to the grocery store and then back to cleaning and organzing the sewing room. It will get finished one of these days!

Until then. . . Quilty Hugs,

PS: I did NOT invent this idea. There are several versions of this around the Net. This is just the way I make mine.

Wednesday, June 6, 2012

Tuesday's Friendship Gathering... Rosemary's JT2

Hello... just a quick post to say "hi" and share a couple of pictures of Rosemary's progress with her Just Takes 2 blocks. She is using all blue and white and the embroidery is dark blue. Really pretty. And, check out the nifty roller-tool that Jill uses to press as she goes when she is hand-piecing. It's fun and it works! Sorry I have been MIA so much the last couple of weeks, but I am trying to get my sewing room rearranged and set up properly --- well, ok, I'll take semi-oranized. Next time I hope to share where I am in the process. Thank you for stopping by. Until next time, I hope you all have fun stitching! Quilty Hugs,