Sunday, April 21, 2013

D.O.N.E. - TaDah!

Whoever is in charge of the Quilting Fairies... thank you! Ta Dah! All four placemats are quilted and bound and ready for their new home!
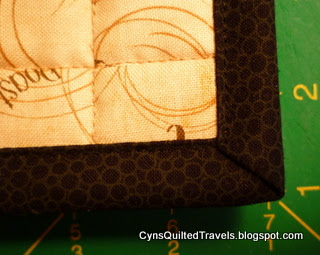
I'm liking the back2front binding method. One small straight line of stitching shows on the back just over 1/8" from the back binding. Looks neat and tidy to me. Think I'll stick with this method for awhile.
This has been a very busy, but very productive day. Love it when a day goes like this. It was such a glorious day today that I had hoped to work outside and get some of my new veggie starts transplanted into their big-girl pots. Well, it didn't happen, but a ton of other good stuff got finished. Sew I'm happy!

Please forgive the lousy photos, but here are all four of the placemats. . . I am pleased with how they turned out. And they are DONE! lol


This is how I'm doing the corners on the front.
 
Until next time. . . It's almost 10 pm now on Saturday night and this ol' lady is heading to the sheets! Nighty night.
 
Edit: LINKING to Connie at FreeMotion by the River.

Quilty Hugs,

Saturday, April 20, 2013

JAVA-TIME PLACEMATS and Reversible Napkin set

This project has taken about forever, but they will be finished by tonight! Even if I have to stay up until midnight, they will be done! 

Clipping on some black fabric for a binding... do I like it? Yes.
The center fussy-cut squares are from a cute fabric line that is no longer available. The primary idea came from a picture in a magazine. Took almost a year to find all the coffee-themed fabric I wanted to use. Then another year to sew them up. lol. You ever do that??? Procrastinate like that?
4 Reversible Napkins
What held me up and took so long? Confession time: I choked on the FMQing, stuttered, got blocked. Sheesh! Because these are a gift, I just plain "tried to hard". . . once I told myself to just get over it and get them done, it was clear sailing. I'm still shaking my head. In the end, I just added some simple quilting lines in a grid and let it go with that... it's fine.  We are our own worst critics, I think. Well, I'm happy now and they are almost done.
Backing... all coffee cups. Cute.
Sure hope their theme is still "coffee" in the breakfast room... it would be more than inconvenient if it has changed to "seashells" or something. lol

Hope where ever you are that you have plenty of time to sew. Until next time. . .

Quilty Hugs,

Tuesday, April 16, 2013

MODIFYING A SEWING MACHINE CABINET for more room to support larger project... sew easy!

Discovering something is sew fun!!! Recently while binding a large-ish lap quilt, I hit upon the idea of using the insert from my sewing machine cabinet and laying it on the open thread drawer! Voila! Instant extra supportive space.  I've had this cabinet for years and this is the first time I've ever thought to try it. Funny, eh?

Open Thread Drawer. . .

Thread drawer open and s.m. insert in place... instant space!
When I purchased the s.m. cabinet some years ago, I also ordered the *extra shelf piece* that is made to fit over the thread drawer when open, but it's so heavy I very seldom use it. Then yesterday in a flash-bulb moment I tried the insert piece which is adequately thick but oh so much lighter to lift! Yippee Skippee... it fits perfectly! Color me Happy!

Pressing surface: quick, handy, easy
As an extra bonus, the two-sided pressing/cutting board that I take to retreats fits right on top so I have a nice sized pressing surface at my disposal also. Love it!! I just love happy accidents like this, don't you? Do you have any you'd like to share in the comment section? Would love to read your light-bulb moments!

Welcome and thank you to the several new Followers who have joined recently. It's great to have you! This week I will be visiting all who have a blog. It's sew fun to connect!

Until next time. . . I have some recently planted geraniums calling my name: apparently some weeds are encroaching! Eeeegads, I'd better get busy! What are YOU up to??

Linking to Connie's Tuesday LinkyParty.

Quilty Hugs,

Monday, April 15, 2013

BINDING BY MACHINE. . . and a few personal thoughts: Thank you!!!

Hello, world!  NOPE, didn't fall off the edge of the planet, but almost! lol.  Not a whole lot of sewing going on around here lately. Have managed a bit of crochet and knitting, but that's about it. Until yesterday. . .

Missy *helping* to sew on the binding
Yesterday was very productive: Bound a colorful quilt that will be donated to my Guild's "Cuddle Quilt Project".  Took a few fun pictures along the way... couldn't resist.  Missy - as usual - had her nose quite literally into my sewing!
Missy loves it under the lamp... so warm!
Try stitching the final wrap of a binding while a kitty is sitting ON the quilt and occasionally turning around and swishing her tail! lol. I had to be sew careful... I was afraid it would get stitched! Luckily all went well.
Stitch to back, then edge-stitch to finish from the front. I like it!
Just one single line of straight-stitch shows on back 1/4" away from bound edge. I like it!
I'm really happy with how the binding turned out. I think I will do more machine applied binding in the future. Can't believe how fast it was... even with Missy's occasional help!
Scrappy little Cuddle Quilt. This will put a smile on a child's face!
One block isolated from the others
Someone else pieced this quilt... I just bound it. I think it is a fun block. I drew it up in EQ7 and have saved the file. If anyone would like a copy of the EQ7 file or block drawing, just let me know in the comments... k? Of course, you need EQ7 or the file won't open... that goes without saying, right? For those who don't have EQ7, I can send a pic of the drawing with the cutting dimensions.

On a personal note: THANK YOU SO MUCH for sticking with me--I appreciate every.single.one.of.you!  Saying my posts have been spasmodic lately is a huge understatement! Most of the *stuff* that has been keeping me away from sewing and blogging is about settled, so I hope to return to normal. You know, "normal", whatever that is! lol. Anyway, thank you very much. I have missed all of you more than words can say.

Until next time, when I will share a wonderful discovery with my sewing machine cabinet. . . I'm gonna go practice some FMQ and try to get my MoJo back. What are YOU working on??

Quilty Hugs,

Thursday, April 4, 2013

PUTTING IT TOGETHER. . . Need suggestions for tool storage

WHEW! It took me a while to follow the "simple directions" and get this new vacuum put together. It may be a little hard to push around, but wow does this thing have suction!!! I think I'm going to like it. It is a 'sealed' system and I know I'm liking that part!

Pieces and the extra *stuff*
 Now to figure out how to store all the odd bits and extra pieces. The only on-board tools are a little brush and the crevice tool. Everything else is going to need an easy storage place. I'm thinking maybe make a bag of some sort that can hold all the extras and then be hung on the back of a door or maybe in the garage. Perhaps making it out of mesh, or partly mesh, so the contents would be more visable, would be a good idea.  It wouldn't be too useful if I forget what is in this bag. lol.
How does everyone else handle this? Anyone have any nifty ideas on how to store all this stuff?? Thanks for any help you can offer.

ATaDah! It's together!
Until next time, guess I'll go clean house. Afterall, I do have a new vacuum to break in. lol. Up next are some hooky projects; knitting for Wounded Warriors; and, Orchids blooming.  What are YOU up to this week??

Thank you so much for stopping in to visit!

Quilty Hugs,

Tuesday, April 2, 2013

A FUN & PRETTY FRUITY SALAD

NO, I didn't fall off the edge of the planet. Sorry I've been MIA these past couple of weeks. The 'bug' came to visit and a bit of life got in the way. I've sure missed my daily visits to blogland and I'm happy to be back!

Let's do something FUN! Want to make a Fruit Salad [or any salad] to take to your next pot luck extra special? I made one in March that turned out pretty good. This is what we are going to make and this is how to do it:

Fresh Fruit Salad with Live Orchid Embellishment


1.) Cut up some fruit and put it in a pretty bowl.


2.) Find a small shot or apparatiff glass, preferable a footed one and wiggle it into the center of the salad.
3.) Pick a fresh Orchid [or flower of your choice] and rinse it off carefully... we don't want bugs in our salad!
Wrap the stem in clear-wrap [like Saran Wrap] - this will do two things: keep any flower juices contained and also helps to keep flower hydrated all day... we don't want our flower to wilt.


4.) Place Orchid in the footed shot glass and voila! You have something pretty and special.
When the party was over, I gave the Orchid to our Hostess. She was delighted!
5.) Put your dish into a carrier of some kind and
carefully lay the Orchid on top... Re-place the orchid in it's footed glass after you arrive at party... too hard to transport with the flower inside the bowl. Ask me how I know this! lol

Much more coming. There will be updates on the Inklingo COTSG Mystery, Yarning projects: both knit and crochet, a scrappy batik TATW in process, a few totes to finish. . . so much to share.

Until next time. . . Thank you so much for stopping by.

Linking to Connie's Tuesday Linky Party at Freemotion by the River.

Quilty Hugs,