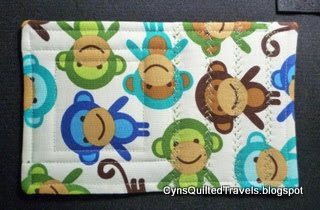
Even little things can be fun. Such as a mug rug created for someone special. This one is for one of the darling ladies that works in DD#2's office. Angel loves everything to do with Monkeys... so monkey fabric is it. I call this little project "Monkeying Around". She'll get a kick out of it.
Remember the bowtie blocks that so many of us made several months ago? I made some out of fruity/veggie fabrics and turned them into placemats... well, a lady who was visiting at Aretoy last week shared her clever idea... cakes! Is this cute or what? The border is the "latte" fabric. Coffee and cake, what could be better?!
That's all there is today; hopefully I'll have some fun pictures tomorrow. Until then I hope you have loads of time to stitch. . .
Quilty Hugs,
Linking to the Tuesday Linky Party at Connie's
A place to share things I love: Family, Friends, Quilts, Gardening, Crocheting, Knitting,Tatting, RV/Camping, and Occasional Trips. . .
Monday, April 30, 2012
Saturday, April 28, 2012
DONE, DONE, DONE... FINISHED EVEN. . .
Cardi D O N E! I think I knitted parts of this sweater three times! lol. But it's done and it did turn out the correct size. . . a nice redeeming quality. It is laying on the blocking board drying right now. Tomorrow it will get its buttons sewn on and then be off to its new home with one of my DD's.
This was a KAL sponsored by LyonBrand Yarn. It is the Simple Raglan Cardi. The pattern is free on their site. If you visit Ravelry, there is a link there also.
I made several changes to the original:
Body: short rows across upper back to lift neck edge; a few more short rows across mid-back to elongate it and keep sweater from riding up; also lengenthened body to just past waist. Did a 10% dec just before bottom ribbing to pull it in. At front edge did a very simple lace insert over 6 stitches of: Sl, K1, YO, K2Tog, YO, K2Tog, continue to work even across row to last 6 stitches: K2Tog, YO, K2Tog, YO, K2. [I slip the first stitch of every row!]
Sleeves: Lengthen to 3/4; work straight to this length then rapid dec of 15 stitches to equal 40, then rib with size 6dpn needles - this gives a one-inch negative ease which perfectly fits DD's elbow/arm circum' of 8.75inches. Working in the round eliminates the sleeve seam and makes this cardi almost seamless [except for weaving 6 stitches at underarm].
Front Band: b/c body was lengthened, more p/up stitches were required. I used 88 which is a muliple of 4 for the K2P2 rib with extra 4 for beg/end and a sl 1 at beg on each row. Size 6 needle. Buttons = 5/8 and 3/4 inch: i bought both and will decide which to sew on tomorrow... probably 3/4 inch.
If I make this again I will knit two rows plain after all yoke increases are finished where yoke, sleeves, body are separated for knitting the lower body. This will greatly facilitate weaving the underarm stitches later. Also, will either knit the whole in the round with a front steek, OR knit the front bands at same time as making the sweater. It seems counterproductive and too much extra work to this knitter to BOTH work back/forth AND pickup for the front bands. This is a nice and very easy pattern. I ran into a bit of trouble b/c I wasn't paying attention when I made several changes to the original pattern -- life happens, eh?! lol
If you decide to knit this little cardi, I hope you will share your project. There is a group on Ravelry. I am "KnittyCyn" - come visit.
I can't close today without sharing what I caught Missy doing the other day. It seems the porcelin bowl was calling her name. I don't understand the facination she has with the sink... at least it is not the toilet! lol
That's it for today. Thank you so much for stopping by. Until next time. . .
Quilty Hugs,
Wednesday, April 25, 2012
STRINGS N THINGS
Well, I've been MIA all week. lol. Finally a finish. Small, but done! My Tuesday Friendship Group pooled some Blue Strings from their stashes and we made some string blocks. Put blocks together and voila! Another Dish Mat. I love making these. With the leftover little blocks, we made a rectangular dish mat to sit in a narrow space next to the sink. Both of these were little "no nothing" surprises for one of our local quilt shops that give us space to meet and sew once a week. Aretoy is so great!
The other pic is hiding somewhere. We made it two blocks wide by four blocks long, added a 1.5 inch border and backed it with a towel like the bigger one.
Hope all is well at your end of the keyboard and that you have time to create something that you love. Until next time. . . keep sewing.
Quilty Hugs,
Wednesday, April 18, 2012
PORTABLE SEWING KIT -- A Very Clever Idea!
What does an Elizabeth Arden eyeglass case and sewing/quilting have in common?
How about a nifty, tidy, handy-dandy, portable sewing kit?! I like it. Works better than my old "breathmint case" because it holds larger scissors. Love it. Thank you, Linda Franz of Inklingo fame, for your wonderful and original idea!
Until next time. . . let's go stitch something!
Quilty hugs,
Linked to: Linda Franz / Inklingo
Labels:
Inklingo,
MiscProj,
Notions,
Organzing,
purse/tote,
quick projects,
small projects
Monday, April 16, 2012
STRINGING ALONG & Knit Cardi Update
Eight blue string blocks completed. I just love to string piece. Is it the randomness, free-construction, tons of color and texture? Maybe all of the above. Do you like stringing? Do you know why? Hmmm, maybe I don't need to know why, just enjoy it. Right?
A quick trim and they look real nice:
Knit Cardi Update: Things were moving along so well... almost to the waist. Then OOPSY!
Frustration doesn't come close to expressing what is happening with this simple knitted cardi. Made another mistake! Yipes... and right smack dab in the center front! No way around it, frog knitting would be involved. A LOT of it... like just over 1/2 the body length! Because the mistake was in the front lace edge, there was no way to drop a few stitches off the needle, let them run down to the mistake, and then hook them back up again properly. When a YO gets left out and everything shifts to the left one stitch... there is no easy fix that this knitter knows of. Oh well. Perhaps it will serve to build more character! lol
That's all for tonight. I hope you had a lovely weekend and have some time this week to stitch up something that makes you happy!
Quilty Hugs,
LINKING TO: Connie's Blog for the Tuesday Linky Party
Monday, April 9, 2012
ON THE NEEDLES - A Simple Raglan Cardi Sweater
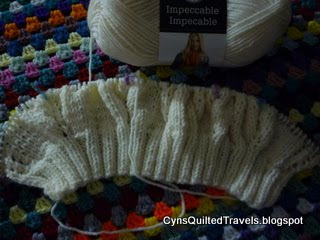
Saturday evening, in addition to all the hub-bub preparation for Easter weekend, I began a new sweater. Yeah, I know... a bit insane. If you would like to make one also, the FREE pattern can be found on the Lyon Brand Yarn site. It is called: Simple Raglan Cardi. Below is what mine looked like by Saturday bedtime:
I have several more rows completed now. This sweater is made from the Top down. I usually begin at the hem, so this is a nice change. It is for my DD Lonna. I am making several changes to the pattern: Sleeves will be 3/4 length; Body will be to waist; Front Edge has small lace insert. A ribbed front will be added after-the-fact for buttons, buttonholes, etc.
Lyon Brand is also hosting a KAL for this sweater, so come join in the fun. All the scoop can be found HERE, as well as a link to the free pattern. A few have finished their sweaters already as they started in February. Some nice photos can be found on Ravelry.
That's it for now. I am off to round up some strings for tomorrow's Friendship Group Meeting. We plan to sew up a storm of blue fabric! Until next time. . .
Quilty hugs,
Sunday, April 8, 2012
FLOWERS SAY SPRINGTIME. . .
Happy Easterfrom my home to yours!
Happy Passover
Happy Springtime
A very nice and dear friend surprised me with these flowers yesterday. Just thought I would share them with you.
Quilty Hugs,
Saturday, April 7, 2012
I WON! Wowzer...
OMGosh! I WON the March Give-A-Way at Connie's blog. A gorgeous Ruler Rack made by Builder Bob himself and even signed on the back! Wonderful -- love that! Connie even included a 6 X 12 Olfa ruler. Great! A gal can always use one of these.
Thank you again so much, Connie and Builder Bob. This Rack will have a special place in my new-soon-2-b-sewing space. I will treasure it. I am so excited; I feel like a kid who wants to jump up and down with glee.
Thank you for stopping by to visit. I hope wherever you are that you have time and space to create something you love. Until next time. . .
Happy Spring and Happy Easter,
Quilty hugs,
Monday, April 2, 2012
LITTLE BIG BEAK - A Chicken Pincushion
With such a BIG mouth, I think this chick will be named "Little Big Beak."
This little guy [girl??] was quick and fun to make. Just took three Charm Squares and a couple inches of rick-rack. First, baste the comb/beak onto two adjoining edges of a Charm Square. I double folded the yellow for the beak.
Trim excess rick-rack from seam allowance after basting.
Next, lay other Charm Square on top lining up edges and stitch around, leaving end opposite the beak completely unsewn/open - this is where the tail will be inserted. Also leave a small opening on another side to turn right side out later. [forgot to take picture at this stage].
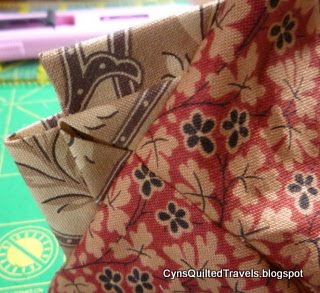
Fold one, two or three, small squares [I used three 2.5"] into Prarie Points. Note how the third one is folded slightly different. Was hoping this would 'fluff' his tail somewhat, and it would have had I not sewn it in upside down. lol
Insert tail, lining up edges and matching two seams. Bringing the two seams together will form the "triangle" giving the Chicken his shape. Trim excess parts of PP from seam allowance and turn right side out. Stuff as desired.
This little chick still needs a couple of beads sewn on for eyes, and maybe some dangling feet - we are still discussing that! lol. There are many different ways to approach making this kind of pincushion. For lots of great info, an easy method, and a great tutorial hop on over to: Riley Blake Designs. Go look. Lot's of fun eye-candy. They have loads of pincushion ideas. Too cute!
That's it for today. Thank you so much for stopping by. Until next time. . .
Quilty Hugs,
Subscribe to:
Posts (Atom)